Solidworks VBA Macro - Add Parallel Mate
In this article we create and understand VBA macro of adding Parallel Mate in Assembly document of SOLIDWORKS CAD Software.
This method is most updated method, so use this method if you want to add Parallel Mate quickly.
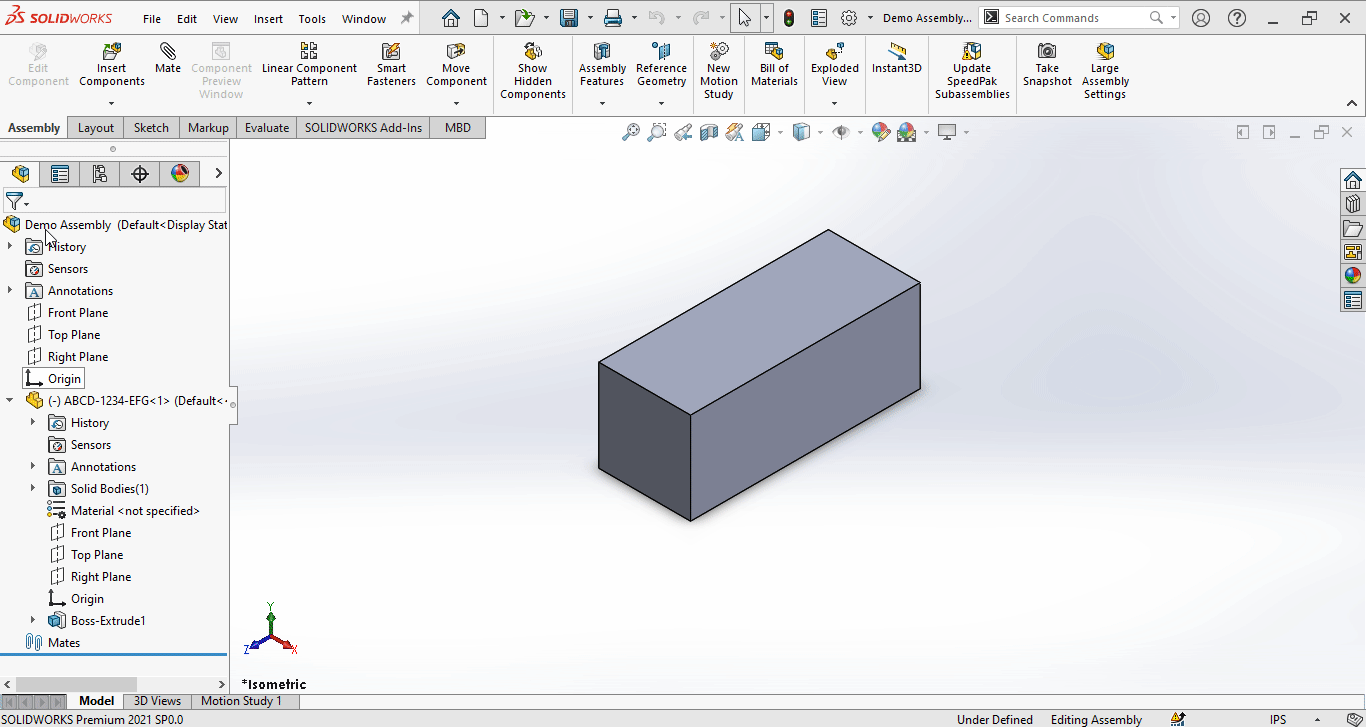
Results We Can Get
After running our macro we successfully add Parallel Mate a Component in an Assembly as a result.
Below image shows the result we get.
We Parallel Mate in following steps in general.
- Get Assembly Name without extension.
- Loop through each plane.
- Get Plane names for selection.
- Select Both Planes.
- Add Parallel Mate.
- Final Work
To get the correct result please follow the steps correctly.
Macro Video
Below 🎬 video shows Adding Parallel Mate from SOLIDWORKS VBA Macros.
How to Add Parallel Mate in Assembly
Please note that there are no explanations in the video.
Explanation of each step and why we write code this way is provided in this post.
VBA Macro
Below is the VBA macro for Parallel Mate.
Option Explicit

' Variable for Solidworks Application
Dim swApp As SldWorks.SldWorks

' Variable for Solidworks document
Dim swDoc As SldWorks.ModelDoc2

' Variable for Solidworks Assembly
Dim swAssembly As SldWorks.AssemblyDoc

' Variable for Solidworks Component
Dim swComponent As SldWorks.Component2

' Variable for Solidworks Mate Feature
Dim swMateFeature As SldWorks.Feature

' Boolean Variable
Dim boolStatus As Boolean

' Program to add Parallel Mate
Sub main()

  ' Set Solidworks Application variable to current application
  Set swApp = Application.SldWorks

  ' Set Solidworks document variable to currently opened document
  Set swDoc = swApp.ActiveDoc

  ' Check if Solidworks document is opened or not
  If swDoc Is Nothing Then
    MsgBox "Solidworks document is not opened."
    Exit Sub
  End If

  ' Set Solidworks Assembly document
  Set swAssembly = swDoc

  ' variable for Assembly Title
  Dim assemblyTitle As String

  ' Get assembly title
  assemblyTitle = swDoc.GetTitle

  ' Variable for List of elements
  Dim vArray As Variant

  ' Using this variable for getting Assembly name without extension
  vArray = Split(assemblyTitle, ".")

  ' Update Assembly Title
  assemblyTitle = vArray(0)

  ' Get Components list in opened assembly
  vArray = swAssembly.GetComponents(True)

  ' Set Solidworks Component variable
  Set swComponent = vArray(0)

  ' Redefine array variable
  ReDim vArray(1 To 3) As String

  ' Update Array list
  vArray(1) = "Front Plane"
  vArray(2) = "Right Plane"
  vArray(3) = "Top Plane"

  ' Variable for loop
  Dim i As Integer

  ' Loop Plane List
  For i = 1 To UBound(vArray)

    ' Variable for Current Plane
    Dim currentPlane As String

    ' Set current plane
    currentPlane = vArray(i)

    ' Variable for First Plane name
    Dim firstSelection As String

    ' Set First Plane Name
    firstSelection = currentPlane + "@" + assemblyTitle

    ' Variable for Second Plane name
    Dim secondSelection As String

    ' Set Second Plane name
    secondSelection = currentPlane + "@" + swComponent.Name + "@" + assemblyTitle

    ' Select First Plane
    boolStatus = swDoc.Extension.SelectByID2(firstSelection, "PLANE", 0, 0, 0, False, 1, Nothing, swSelectOptionDefault)

    ' Select Second Plane
    boolStatus = swDoc.Extension.SelectByID2(secondSelection, "PLANE", 0, 0, 0, True, 1, Nothing, swSelectOptionDefault)

    ' Add Parallel Mate
    Set swMateFeature = swAssembly.AddMate5(swMatePARALLEL, swMateAlignALIGNED, False, 0, 0, 0, 0, 0, 0, 0, 0, False, False, 0, swAddMateError_ErrorUknown)

    ' Check if Mate is added or not
    If swMateFeature Is Nothing Then
      MsgBox "Failed to Add Mate."
      swDoc.ClearSelection2 True
      Exit Sub
    End If

  Next

  ' Rebuild assembly
  swDoc.ForceRebuild3 True

  ' Zoom to fit
  swDoc.ViewZoomtofit2

End Sub
Prerequisite
There are some prerequisite for this article.
-
Knowledge of VBA programming language is ❗required.
-
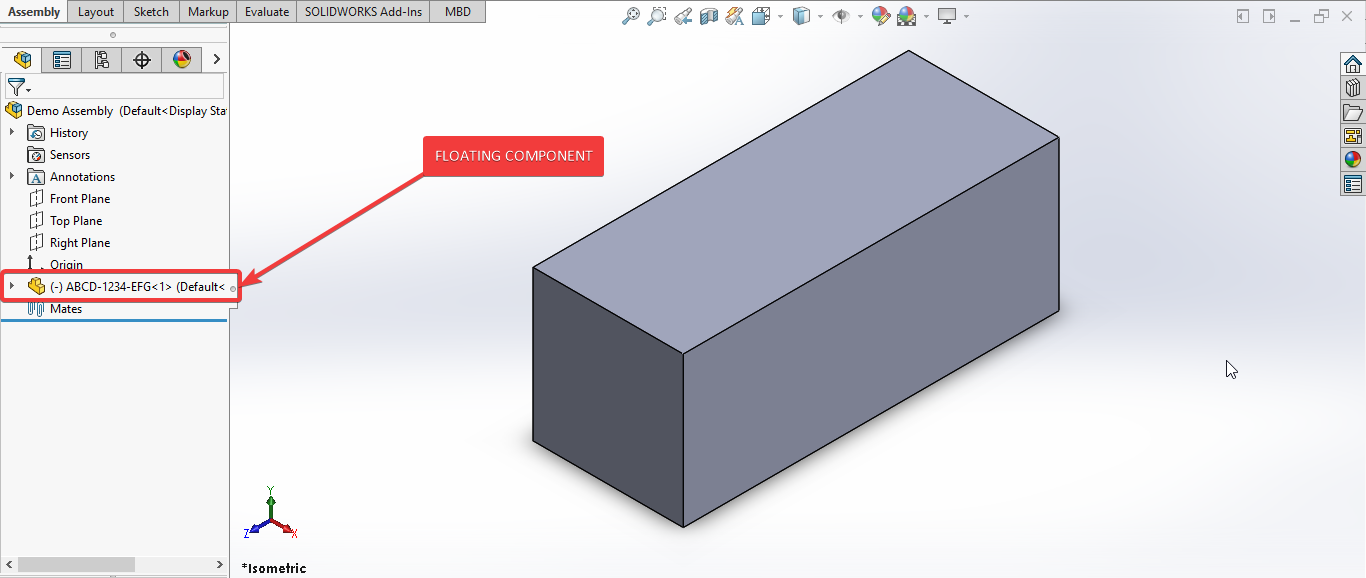
We use an existing part in Assembly document.
-
This component is Float as shown in below image.
We will apply checks in this article, so the code we write should be error free most of the time.
Steps To Follow
This VBA macro can be divided into following sections:
- Create and Initialize required variables
- Get Assembly Title
- First Component and Plane List
- Get Plane names
- Select Planes
- Add Parallel Mate
- Final Work
Every section with each line is explained below.
I also give some links (see icon 🚀) so that you can go through them if there are anything I explained in previous articles.
Create and Initialize required variables
Option Explicit
- Purpose: Above line forces us to define every variable we are going to use.
- Reference: SOLIDWORKS Macros - Open new Part document article.
' Variable for Solidworks application
Dim swApp As SldWorks.SldWorks
- Purpose: In above line, we create a variable for Solidworks application.
- Variable Name:
swApp - Type:
SldWorks.SldWorks - Reference: Please visit online SOLIDWORKS API Help .
' Variable for Solidworks document
Dim swDoc As SldWorks.ModelDoc2
- Purpose: In above line, we create a variable for Solidworks document.
- Variable Name:
swDoc - Type:
SldWorks.ModelDoc2 - Reference: Please visit online SOLIDWORKS API Help .
' Variable for Solidworks Assembly
Dim swAssembly As SldWorks.AssemblyDoc
- Purpose: In above line, we create a variable for Solidworks Assembly.
- Variable Name:
swAssembly - Type:
SldWorks.AssemblyDoc - Reference: Please visit online SOLIDWORKS API Help .
' Variable for Solidworks Component
Dim swComponent As SldWorks.Component2
- Purpose: In above line, we create a variable for Solidworks Component.
- Variable Name:
swComponent - Type:
SldWorks.Component2. - Reference: Please visit online SOLIDWORKS API Help .
' Variable for Solidworks Mate Feature
Dim swMateFeature As SldWorks.Feature
- Purpose: In above line, we create a variable for Solidworks Mate Feature.
- Variable Name:
swMateFeature - Type:
SldWorks.Feature. - Reference: Please visit online SOLIDWORKS API Help .
' Boolean Variable
Dim boolStatus As Boolean
- Purpose: In above line, we create a variable for Boolean selection.
- Variable Name:
boolStatus - Type:
Boolean
These all are our global variables.
They are SOLIDWORKS API Objects.
' Program to add Parallel Mate
Sub main()

End Sub
- In above line, we create main Program to add Parallel Mate in assembly.
- This is a
Subprocedure which has name ofmain. - This procedure hold all the statements (instructions) we give to computer.
- Reference: Detailed information VBA Sub and Function Procedures article of this website.
' Set Solidworks Application variable to current application
Set swApp = Application.SldWorks
- In above line, we set value of
swAppvariable. - This value is currently opened Solidworks application.
' Set Solidworks document variable to currently opened document
Set swDoc = swApp.ActiveDoc
- In above line, we set value of
swDocvariable. - This value is currently opened part document.
' Check if Solidworks document is opened or not
If swDoc Is Nothing Then
  MsgBox ("Solidworks document is not opened.")
  Exit Sub
End If
- In above code block, we check if we successfully set the value of
swDocvariable. - We use IF statement for checking.
- Condition:
swDoc Is Nothing - When this condition is
True,- We show and message window to user.
- Message: SOLIDWORKS document is not opened.
- Then we stop our macro here.
' Set Solidworks Assembly document
Set swAssembly = swDoc
- In above line, we set value of
swAssemblyvariable. - This value is
swDocvariable.
Get Assembly Title
In this section, we Get Assembly Title without extension.
' variable for Assembly Title
Dim assemblyTitle As String
- Purpose: In above line, we create a variable for Assembly Title.
- Variable Name:
assemblyTitle - Type:
String
' Get assembly title
assemblyTitle = swDoc.GetTitle
- In above line, we set the value of
assemblyTitlevariable. - We set value by
GetTitlemethod ofswDocvariable.
' Variable for List of elements
Dim vArray As Variant
- Purpose: In above line, we create a variable for List of elements.
- Variable Name:
vArray - Type:
Variant
' Using this variable for getting Assembly name without extension
vArray = Split(assemblyTitle, ".")
- In above line, we set the value of
vArrayvariable. - We set value by
Splitmethod. Splitmethod takes 2 arguments.- Input
Stringwhich we want to split. - Delimiter, by which we want to split the Input
String.
- Input
' Update Assembly Title
assemblyTitle = vArray(0)
- In above line, we set the value of
assemblyTitlevariable. - We set value to First instance
vArrayvariable.
First Component and Plane List
In this section, we Get First Component and update Plane List.
' Get Components list in opened assembly
vArray = swAssembly.GetComponents(True)
- In above line, we set the value of
vArrayvariable. - We set value by
GetComponentsmethod ofswAssemblyvariable.
' Set Solidworks Component variable
Set swComponent = vArray(0)
- In above line, we set value of
swComponentvariable. - This value is First component inside
vArrayvariable. - We get current component by Indexing
vArrayvariable.
' Redefine array variable
ReDim vArray(1 To 3) As String
- In above line, we Redefine Array of String.
- Variable Name:
vArray - Type:
String - Length of Array: (1 To 3)
- Reference: Please visit
- For Arrays in VBA : Array on this website .
' Update Array list
vArray(1) = "Front Plane"
vArray(2) = "Right Plane"
vArray(3) = "Top Plane"
In above code, we update Array list by adding Plane names.
' Variable for loop
Dim i As Integer
- In above line, we create a variable as a counter.
- Variable Name:
i - Type:
Integer
' Loop Plane List
For i = 1 To UBound(vArray)

Next
- In above line, we create a
Forloop. - This loops start from
i = 1to maximum ofvArraywe select.
Get Plane names
In this section, we Get Plane names.
' Variable for Current Plane
Dim currentPlane As String
- In above line, we create a variable for Current Plane.
- Variable Name:
currentPlane - Type:
String
' Set current plane
currentPlane = vArray(i)
- In above line, we set value of
currentPlanevariable. - This value is plane inside
vArrayvariable. - We get current component by Indexing
vArrayvariable.
' Variable for First Plane name
Dim firstSelection As String
- In above line, we create a variable for First Plane name.
- Variable Name:
firstSelection - Type:
String
' Set First Plane Name
firstSelection = currentPlane + "@" + assemblyTitle
- In above line, we set value of
firstSelectionvariable. - This value is combinations of
currentPlane&assemblyTitlevariables.
' Variable for Second Plane name
Dim secondSelection As String
- In above line, we create a variable for Second Plane name.
- Variable Name:
secondSelection - Type:
String
' Set Second Plane name
secondSelection = currentPlane + "@" + swComponent.Name + "@" + assemblyTitle
- In above line, we set value of
secondSelectionvariable. - This value is combinations of
currentPlane,swComponent.Name&assemblyTitlevariables.
Select Planes
In this section, we Select Planes.
' Select First Plane
boolStatus = swDoc.Extension.SelectByID2(firstSelection, "PLANE", 0, 0, 0, False, 1, Nothing, swSelectOptionDefault)
- In above line, we select First Plane.
' Select Second Plane
boolStatus = swDoc.Extension.SelectByID2(secondSelection, "PLANE", 0, 0, 0, True, 1, Nothing, swSelectOptionDefault)
- In above line, we select Second Plane.
Add Parallel Mate
In this section, we add Parallel Mate.
' Add Parallel Mate
Set swMateFeature = swAssembly.AddMate5(swMatePARALLEL, swMateAlignALIGNED, False, 0, 0, 0, 0, 0, 0, 0, 0, False, False, 0, swAddMateError_ErrorUknown)
-
In above line, we set the value of variable
swMateFeaturebyAddMate5method. -
This
AddMate5method takes following parameters as explained:-
MateTypeFromEnum - Type of mate as defined in
swMateType_e:
swMateType_e Enum Members Member Description swMateANGLE6 swMateCAMFOLLOWER9 swMateCOINCIDENT0 swMateCONCENTRIC1 swMateCOORDINATE20 swMateDISTANCE5 swMateGEAR10 swMateHINGE22 swMateLINEARCOUPLER18 swMateLOCK16 swMateLOCKTOSKETCH12 swMateMAGNETIC25 swMateMAXMATES14 swMatePARALLEL3 swMatePATH15 swMatePERPENDICULAR2 swMatePROFILECENTER24 swMateRACKPINION13 swMateSCREW17 swMateSLIDER23 swMateSLOT21 swMateSYMMETRIC8 swMateTANGENT4 swMateUNIVERSALJOINT19 swMateUNKNOWN7 swMateWIDTH11 -
-
AlignFromEnum - Type of mate as defined in
swMateAlign_e:
| Member | Description |
|---|---|
swAlignAGAINST
| Obsolete. Do not use. |
swAlignNONE
| Obsolete. Do not use. |
swAlignSAME
| Obsolete. Do not use. |
swMateAlignALIGNED
| 0 |
swMateAlignANTI_ALIGNED
| 1 |
swMateAlignCLOSEST
| 2 |
</div>
-
Flip -
Trueto flip the mate entities,Falseto not; valid only ifMateTypeFromEnumisswMatetype_e.swMateDISTANCE. -
Distance - Distance value; valid only if
MateTypeFromEnumisswMateType_e.swMateDISTANCE. -
DistanceAbsUpperLimit - Absolute maximum distance value; valid only if
MateTypeFromEnumisswMateType_e.swMateDISTANCE. -
DistanceAbsLowerLimit - Absolute minimum distance value; valid only if
MateTypeFromEnumisswMateType_e.swMateDISTANCE. -
GearRatioNumerator - Gear ratio numerator value; valid only if
MateTypeFromEnumisswMateType_e.swMateGEAR. -
GearRatioDenominator - Gear ratio denominator value; valid only if
MateTypeFromEnumisswMateType_e.swMateGEAR. -
Angle - Angle value; valid only if
MateTypeFromEnumisswMateType_e.swMateANGLE. -
AngleAbsUpperLimit - Absolute maximum angle value; valid only if
MateTypeFromEnumisswMateType_e.swMateANGLE. -
AngleAbsLowerLimit - Absolute minimum angle value; valid only if
MateTypeFromEnumisswMateType_e.swMateANGLE. -
ForPositioningOnly -
Trueto only position the components according to the mating relationship and not return a mate,Falseto return a mate. -
LockRotation -
Trueto lock component rotation,Falseto not. -
WidthMateOption - Width mate options as defined in
swMateWidthOptions_e; valid only ifMateTypeFromEnumisswMateType_e.swMateWIDTH.
| Member | Description |
|---|---|
swMateWidth_Centered
| 0 |
swMateWidth_Dimension
| 2 |
swMateWidth_Free
| 1 |
swMateWidth_Percent
| 3 |
</div>
-
ErrorStatus - Success or error as defined by
swAddMateError_eas follows.
| Member | Description |
|---|---|
swAddMateError_ErrorUknown
| 0 |
swAddMateError_IncorrectAlignment
| 3 |
swAddMateError_IncorrectGearRatios
| 6 |
swAddMateError_IncorrectMateType
| 2 |
swAddMateError_IncorrectSelections
| 4 |
swAddMateError_NoError
| 1 |
swAddMateError_OverDefinedAssembly
| 5 |
</div>
-
Return Value : This
AddMate5method return 👉 Mate2 data object. -
In our code, I have used following values:
AddMate5 Parameter Values Used Parameter Name Value Used MateTypeFromEnum swMatePARALLELAlignFromEnum swMateAlignALIGNEDFlip falseDistance 0DistanceAbsUpperLimit 0DistanceAbsLowerLimit 0GearRatioNumerator 0GearRatioDenominator 0Angle 0AngleAbsUpperLimit 0AngleAbsLowerLimit 0ForPositioningOnly FalseLockRotation FalseWidthMateOption 0ErrorStatus swAddMateError_ErrorUknown
</div>
Reference: For more details about
- Solidworks AssemblyDoc details: online Solidworks API Help for Solidworks Feature Manager.
- AddMate5 Method:
online Solidworks API Help
for
AddMate5Method.
' Check if Mate is added or not
If swMateFeature Is Nothing Then
  MsgBox "Failed to Add Mate."
  swDoc.ClearSelection2 True
  Exit Sub
End If
- In above code block, we check if we successfully added Parallel Mate or not.
- We use IF statement for checking.
- Condition:
swMateFeature Is Nothing - When this condition is
True,- We show and message window to user.
- Message: *Failed to Add Mate.
- After that we clear the selection.
- Then we stop our macro here.
Now we run the macro and after running macro we get Parallel Mate as shown in below image.
Final work
In this section, after adding Parallel Mate, we have to do some cleaning work so that we can use this macro frequently.
' Rebuild assembly
swDoc.ForceRebuild3 True
- In above line, we Rebuild assembly.
- For this we use
ForceRebuild3method which is part of SOLIDWORKS Document variable i.eswDocvariable.
' View zoom to fit
swDoc.ViewZoomtofit2
- In above line, we make our view zoom to fit the model.
- For this we use
ViewZoomtofit2method which is part of SOLIDWORKS Document variable i.eswDocvariable.
This is it !!!
I hope my efforts will helpful to someone!
If you found anything to add or update, please let me know on my e-mail.
Hope this post helps you to Parallel Mate with SOLIDWORKS VBA Macros.
For more such tutorials on SOLIDWORKS VBA Macro, do come to this website after sometime.
If you like the post then please share it with your friends also.
Do let me know by you like this post or not!
Till then, Happy learning!!!
</div>