Solidworks Macro - Rotate/Copy Sketch Entities
In this post, I tell you about how to Rotate/Copy Sketch Entities using Solidworks VBA Macros in a Sketch.
In this post, I explain about RotateOrCopy method from Solidworks ModelDoc2’s Extension object.
This method is most updated method, I found in Solidworks API Help.
So use this method if you want to RotateOrCopy Sketch Entities.
This post is similar to previous Sketch Transformation - Move/Copy Sketch Entities post.
If you have not visited my previous Sketch Transformation - Move/Copy Sketch Entities post, then please do check-it if you want to learn Move/Copy Sketch Entitiess.
Video of Code on YouTube
Please see below video on how to Rotate/Copy Sketch Entities from Solidworks VBA Macros.
How to Rotate/Copy Sketch Entities
Please note that there are no explanations in the video.
Explanation of each step and why we write code this way is provided in this post.
Code Sample
Below is the code sample to Rotate/Copy Sketch Entities.
Option Explicit

' Create variable for Solidworks application
Dim swApp As SldWorks.SldWorks

' Create variable for Solidworks document
Dim swDoc As SldWorks.ModelDoc2

' Boolean Variable
Dim BoolStatus As Boolean

' Create variable for Solidworks Sketch Manager
Dim swSketchManager As SldWorks.SketchManager

' Create Variable for Solidworks Sketch Segment
Dim swSketchSegment As SldWorks.SketchSegment

' Main function of our VBA program
Sub main()

  ' Set Solidworks variable to Solidworks application
  Set swApp = Application.SldWorks

  ' Create string type variable for storing default part location
  Dim defaultTemplate As String

  ' Set value of this string type variable to "Default part template"
  defaultTemplate = swApp.GetUserPreferenceStringValue(swUserPreferenceStringValue_e.swDefaultTemplatePart)

  ' Set Solidworks document to new part document
  Set swDoc = swApp.NewDocument(defaultTemplate, 0, 0, 0)

  '-----------------------UNIT CONVERSION----------------------------------------

  ' Local variables used as Conversion Factors
  Dim LengthConversionFactor As Double
  Dim AngleConversionFactor As Double

  ' Use a Select Case, to get the length of active Unit and set the different factors
  Select Case swDoc.GetUnits(0)       ' GetUnits function gives us, active unit

    Case swMETER    ' If length is in Meter
      LengthConversionFactor = 1
      AngleConversionFactor = 1

    Case swMM       ' If length is in MM
      LengthConversionFactor = 1 / 1000
      AngleConversionFactor = 1 * 0.01745329

    Case swCM       ' If length is in CM
      LengthConversionFactor = 1 / 100
      AngleConversionFactor = 1 * 0.01745329

    Case swINCHES   ' If length is in INCHES
      LengthConversionFactor = 1 * 0.0254
      AngleConversionFactor = 1 * 0.01745329

    Case swFEET     ' If length is in FEET
      LengthConversionFactor = 1 * (0.0254 * 12)
      AngleConversionFactor = 1 * 0.01745329

    Case swFEETINCHES     ' If length is in FEET & INCHES
      LengthConversionFactor = 1 * 0.0254  ' For length we use sama as Inch
      AngleConversionFactor = 1 * 0.01745329

    Case swANGSTROM        ' If length is in ANGSTROM
      LengthConversionFactor = 1 / 10000000000#
      AngleConversionFactor = 1 * 0.01745329

    Case swNANOMETER       ' If length is in NANOMETER
      LengthConversionFactor = 1 / 1000000000
      AngleConversionFactor = 1 * 0.01745329

    Case swMICRON       ' If length is in MICRON
      LengthConversionFactor = 1 / 1000000
      AngleConversionFactor = 1 * 0.01745329
  End Select

  '----------------------------------------------------------------

  ' Select Front Plane
  BoolStatus = swDoc.Extension.SelectByID2("Front Plane", "PLANE", 0, 0, 0, False, 0, Nothing, swSelectOption_e.swSelectOptionDefault)

  ' Set Sketch manager for our sketch
  Set swSketchManager = swDoc.SketchManager

  ' Insert a sketch into selected plane
  swSketchManager.InsertSketch True

  ' Create a local variable for CenterPoint ractangle
  Dim vSketch As Variant

  ' Create CenterPoint ractangle
  vSketch = swSketchManager.CreateCenterRectangle(0, 0, 0, 1 * LengthConversionFactor, 1 * LengthConversionFactor, 0)

  ' De-select the lines after creation
  swDoc.ClearSelection2 True

  ' Select all lines of CenterPoint Ractangle
  BoolStatus = swDoc.Extension.SelectByID2("Line1", "SKETCHSEGMENT", 0, 0, 0, True, 0, Nothing, swSelectOption_e.swSelectOptionDefault)
  BoolStatus = swDoc.Extension.SelectByID2("Line2", "SKETCHSEGMENT", 0, 0, 0, True, 0, Nothing, swSelectOption_e.swSelectOptionDefault)
  BoolStatus = swDoc.Extension.SelectByID2("Line3", "SKETCHSEGMENT", 0, 0, 0, True, 0, Nothing, swSelectOption_e.swSelectOptionDefault)
  BoolStatus = swDoc.Extension.SelectByID2("Line4", "SKETCHSEGMENT", 0, 0, 0, True, 0, Nothing, swSelectOption_e.swSelectOptionDefault)

  ' Rotate CenterPoint Ractangle by 45 degree only
  swDoc.Extension.RotateOrCopy False, 1, True, 0, 0, 0, 0, 0, 1, 45 * AngleConversionFactor

  ' De-select all after creation
  swDoc.ClearSelection2 True

  ' Show Front View after Circular Sketch Pattern
  swDoc.ShowNamedView2 "", swStandardViews_e.swFrontView

  ' Zoom to fit screen in Solidworks Window
  swDoc.ViewZoomtofit2

End Sub
Understanding the Code
Now let us walk through each line in the above code, and understand the meaning and purpose of every line.
I also give some link so that you can go through them if there are anything I explained in previous posts.
Option Explicit
This line forces us to define every variable we are going to use.
For more information please visit Solidworks Macros - Open new Part document post.
' Create variable for Solidworks application
Dim swApp As SldWorks.SldWorks
In this line, we create a variable which we named as swApp and the type of this swApp variable is SldWorks.SldWorks.
' Create variable for Solidworks document
Dim swDoc As SldWorks.ModelDoc2
In this line, we create a variable which we named as swDoc and the type of this swDoc variable is SldWorks.ModelDoc2.
' Boolean Variable
Dim BoolStatus As Boolean
In this line, we create a variable named BoolStatus as Boolean object type.
' Create variable for Solidworks Sketch Manager
Dim swSketchManager As SldWorks.SketchManager
In above line, we create variable swSketchManager for Solidworks Sketch Manager.
As the name suggested, a Sketch Manager holds variours methods and properties to manage Sketches.
To see methods and properties related to SketchManager object, please visit
this page of Solidworks API Help
' Create variable for Solidworks Sketch Segment
Dim swSketchSegment As SldWorks.SketchSegment
In this line, we Create a variable which we named as swSketchSegment and the type of this swSketchSegment variable is SldWorks.SketchSegment.
We create variable swSketchSegment for Solidworks Sketch Segments.
To see methods and properties related to swSketchSegment object, please visit
this page of Solidworks API Help
These all are our global variables.
As you can see in code sample, they are Solidworks API Objects.
So basically I group all the Solidworks API Objects in one place.
I have also place boolean type object at top also, because after certain point we will need this variable frequently.
Thus, I have started placing it here.
Next is our Sub procedure which has name of main.
This procedure hold all the statements (instructions) we give to computer.
' Set Solidworks variable to Solidworks application
Set swApp = Application.SldWorks
In this line, we set the value of our Solidworks variable swApp; which we define earlier; to Solidworks application.
' Create string type variable for storing default part location
Dim defaultTemplate As String
' Set value of this string type variable to "Default part template"
defaultTemplate = swApp.GetUserPreferenceStringValue(swUserPreferenceStringValue_e.swDefaultTemplatePart)
In 1st statement of above example, we are defining a variable of string type and named it as defaultTemplate.
This variable defaultTemplate, hold the location the location of Default Part Template.
In 2nd line of above example. we assign value to our newly define defaultTemplate variable.
We assign the value by using a Method named GetUserPreferenceStringValue().
This GetUserPreferenceStringValue() method is a part of our main Solidworks variable swApp.
' Set Solidworks document to new part document
Set swDoc = swApp.NewDocument(defaultTemplate, 0, 0, 0)
In this line, we set the value of our swDoc variable to new document.
For detailed information about these lines please visit Solidworks Macros - Open new Part document post.
I have discussed them thoroghly in Solidworks Macros - Open new Part document post, so do checkout that post if you want to understand above code in more detail.
'-----------------------UNIT CONVERSION----------------------------------------

' Local variables used as Conversion Factors
Dim LengthConversionFactor As Double
Dim AngleConversionFactor As Double

' Use a Select Case, to get the length of active Unit and set the different factors
Select Case swDoc.GetUnits(0)       ' GetUnits function gives us, active unit

  Case swMETER    ' If length is in Meter
    LengthConversionFactor = 1
    AngleConversionFactor = 1

  Case swMM       ' If length is in MM
    LengthConversionFactor = 1 / 1000
    AngleConversionFactor = 1 * 0.01745329

  Case swCM       ' If length is in CM
    LengthConversionFactor = 1 / 100
    AngleConversionFactor = 1 * 0.01745329

  Case swINCHES   ' If length is in INCHES
    LengthConversionFactor = 1 * 0.0254
    AngleConversionFactor = 1 * 0.01745329

  Case swFEET     ' If length is in FEET
    LengthConversionFactor = 1 * (0.0254 * 12)
    AngleConversionFactor = 1 * 0.01745329

  Case swFEETINCHES     ' If length is in FEET & INCHES
    LengthConversionFactor = 1 * 0.0254  ' For length we use sama as Inch
    AngleConversionFactor = 1 * 0.01745329

  Case swANGSTROM        ' If length is in ANGSTROM
    LengthConversionFactor = 1 / 10000000000#
    AngleConversionFactor = 1 * 0.01745329

  Case swNANOMETER       ' If length is in NANOMETER
    LengthConversionFactor = 1 / 1000000000
    AngleConversionFactor = 1 * 0.01745329

  Case swMICRON       ' If length is in MICRON
    LengthConversionFactor = 1 / 1000000
    AngleConversionFactor = 1 * 0.01745329
End Select
’—————————————————————-
Above code sample shows how to fix Solidworks API Unit issue.
We 1st get the current unit of the part and apply the switch statements to update our Length and Angle Conversion factors.
I have already explained in detail about Fixing Solidworks API Unit Issue in General - Fix Unit Issue blog post.
Do checkout above post for Fixing Solidworks API Issue.
' Select Front Plane
BoolStatus = swDoc.Extension.SelectByID2("Front Plane", "PLANE", 0, 0, 0, False, 0, Nothing, swSelectOption_e.swSelectOptionDefault)
In above line, we select the front plane by using SelectByID2 method from Extension object.
For more information about selection method please visit Solidworks Macros - Selection Methods post.
' Set Sketch manager for our sketch
Set swSketchManager = swDoc.SketchManager
In above line, we set the Sketch manager variable to current document’s sketch manager.
' Insert a sketch into selected plane
swSketchManager.InsertSketch True
In above line, we use InsertSketch method of SketchManager and give True value.
This method allows us to insert a sketch in selected plane.
' Create a local variable for CenterPoint ractangle
Dim vSketch As Variant

' Create CenterPoint ractangle
vSketch = swSketchManager.CreateCenterRectangle(0, 0, 0, 1 * LengthConversionFactor, 1 * LengthConversionFactor, 0)
In above code sample, we do following:
-
Create a local variable named
vSketch, which isVarianttype. -
In 2nd line, we Create CenterPoint ractangle by using
CreateCenterRectanglemethod.
This `CreateCenterRectangle` method is available in `swSketchManager` variable.
- This
CreateCenterRectanglemethod return a value. We store that value in previously defined variablevSketch.
Side of CenterPoint ractangle: 1” or 1 inch
If you want to know more about CreateCenterRectangle method, then please visit
Sketch - Create Center Rectangle
post.
I have given a detail explaination about CreateCenterRectangle method there.
' De-select the lines after creation
swDoc.ClearSelection2 True
After creating a Square, we de-select all entities.
' Select all lines of Center Ractangle
BoolStatus = swDoc.Extension.SelectByID2("Line1", "SKETCHSEGMENT", 0, 0, 0, True, 0, Nothing, swSelectOption_e.swSelectOptionDefault)
BoolStatus = swDoc.Extension.SelectByID2("Line2", "SKETCHSEGMENT", 0, 0, 0, True, 0, Nothing, swSelectOption_e.swSelectOptionDefault)
BoolStatus = swDoc.Extension.SelectByID2("Line3", "SKETCHSEGMENT", 0, 0, 0, True, 0, Nothing, swSelectOption_e.swSelectOptionDefault)
BoolStatus = swDoc.Extension.SelectByID2("Line4", "SKETCHSEGMENT", 0, 0, 0, True, 0, Nothing, swSelectOption_e.swSelectOptionDefault)
In above line of code, we select all lines of Center Ractangle by using SelectByID2 method from swDoc.Extension object.
I have not create separate variable Extension, because I like to avoid creating extra objects.
Please not that we have selected only Sides, not the diagonals.
' Rotate Center Ractangle
swDoc.Extension.RotateOrCopy False, 1, True, 0, 0, 0, 0, 0, 1, 45 * AngleConversionFactor
For “Rotating” a sketch entity, we need RotateOrCopy method from Solidworks ModelDoc2’s Extension object.
This RotateOrCopy method takes following parameters as explained:
-
Copy :
Trueto copy the sketch entities,Falseto not. -
NumCopies : Number of copies you want to create.
-
KeepRelations :
Trueto keep sketch relations after Rotate or Copy operation,Falseto not. -
BaseX : X coordinate of the base point from which to Rotate the sketch entities.
-
BaseY : Y coordinate of the base point from which to Rotate the sketch entities.
-
BaseZ : Z coordinate of the base point from which to Rotate the sketch entities.
-
DestX : X coordinate of the destination point from which to Rotate the sketch entities.
-
DestY : Y coordinate of the destination point from which to Rotate the sketch entities.
-
DestZ : Z coordinate of the destination point from which to Rotate the sketch entities.
-
Angle : Angle of Rotation by which we rotate the selected sketch entities.
There are no return value after this function.
Destination Point Values
Destination Point is defined by following parameters:
-
DestX
-
DestY
-
DestZ
The values of these parameters are mainly dependent on the plane, you have selected.
There values as per Default Planes is given below.
On X-Y Plane
When X-Y plane is selected, then values are:
-
DestX = 0
-
DestY = 0
-
DestZ = 1
On Y-Z Plane
When Y-Z plane is selected, then values are:
-
DestX = 1
-
DestY = 0
-
DestZ = 0
On X-Z Plane
When X-Z plane is selected, then values are:
-
DestX = 0
-
DestY = 1
-
DestZ = 0
Since we are creating our Sketch in X-Y plane, hence I used the values accordingly.
Cases
In this section, we will go through different cases by
-
Modifying different parameters
-
See images, before and after parameter modification
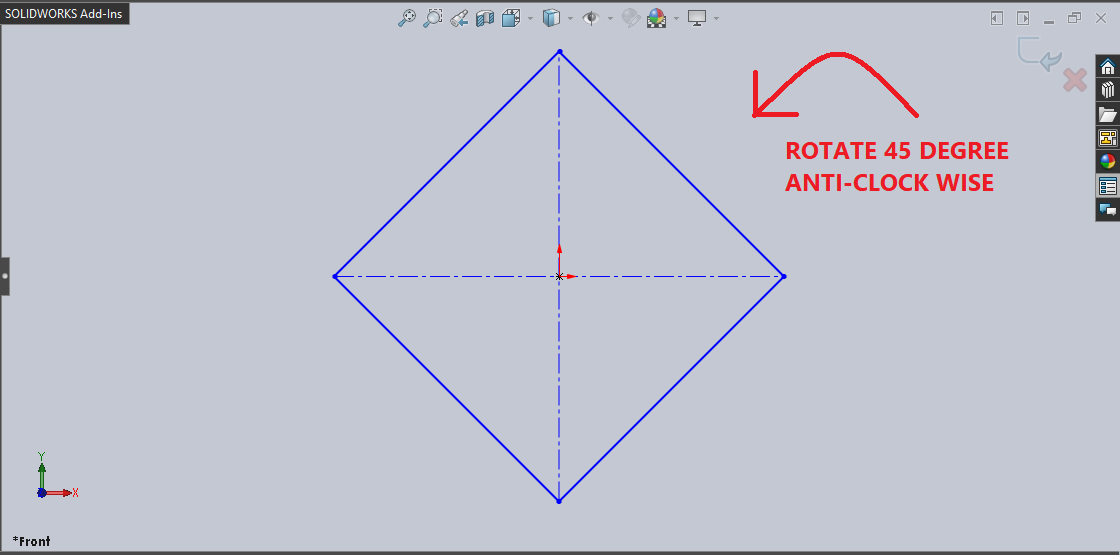
CASE 1 : Rotate Sketch Entities
In our code, if we want to Rotate Sketch Entities, then we need to use code sample as given below:
' Rotate circle
swDoc.Extension.RotateOrCopy False, 1, True, 0, 0, 0, 0, 0, 1, 45 * AngleConversionFactor
In above code we Rotate Sketch Entities with:
-
Base Point :
0, 0, 0 -
Rotation Angle :
45 DegreeAnti-clock wise.
If you want to rotate Clock-wise, then then use Negeative (-ve) value.
In above code we need to set following parameters:
-
Copy :
Falseto not create a copy. -
NumCopies : Number of copies you want to create to 1 which is itself.
-
KeepRelations :
Trueto keep sketch relations after Rotate or Copy operation. -
BaseX : X coordinate of the base point = 0
-
BaseY : Y coordinate of the base point = 0
-
BaseZ : Z coordinate of the base point = 0
Since we are creating sketch in X-Y plane, hence I used values mentioned in Destination Point Values section of this post.
-
DestX : X coordinate of the destination = 0
-
DestY : Y coordinate of the destination point = 0
-
DestZ : Z coordinate of the destination point = 1
-
Rotation Angle : Angle of Rotation by which we rotate the selected sketch entities =
45 DegreeAnti-clock wise.
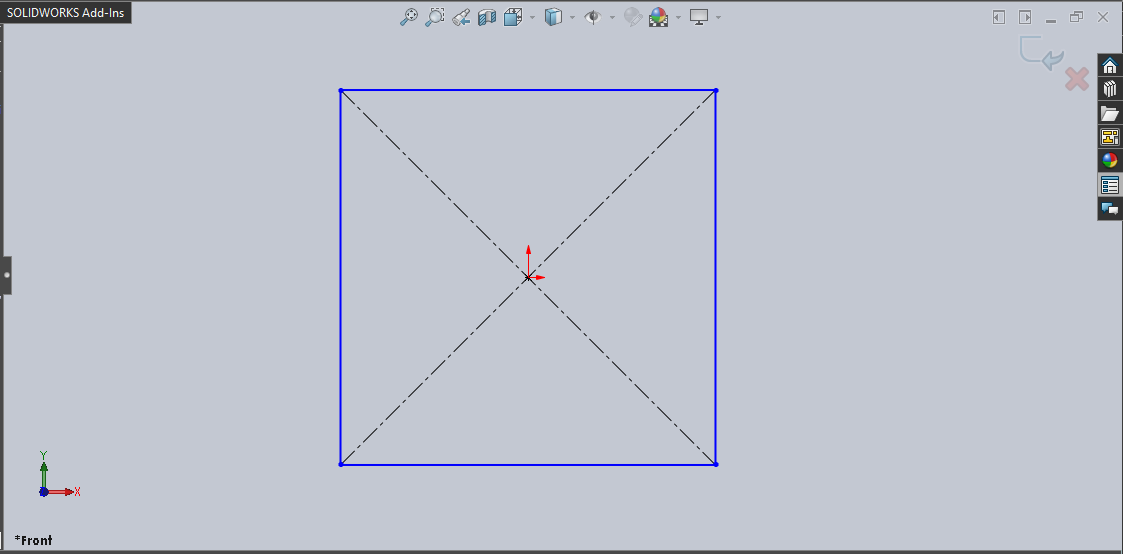
Example Images:
Below image shows before and after we Rotate Sketch Entitny.
Before Rotate Sketch Entitny
After Rotate Sketch Entitny
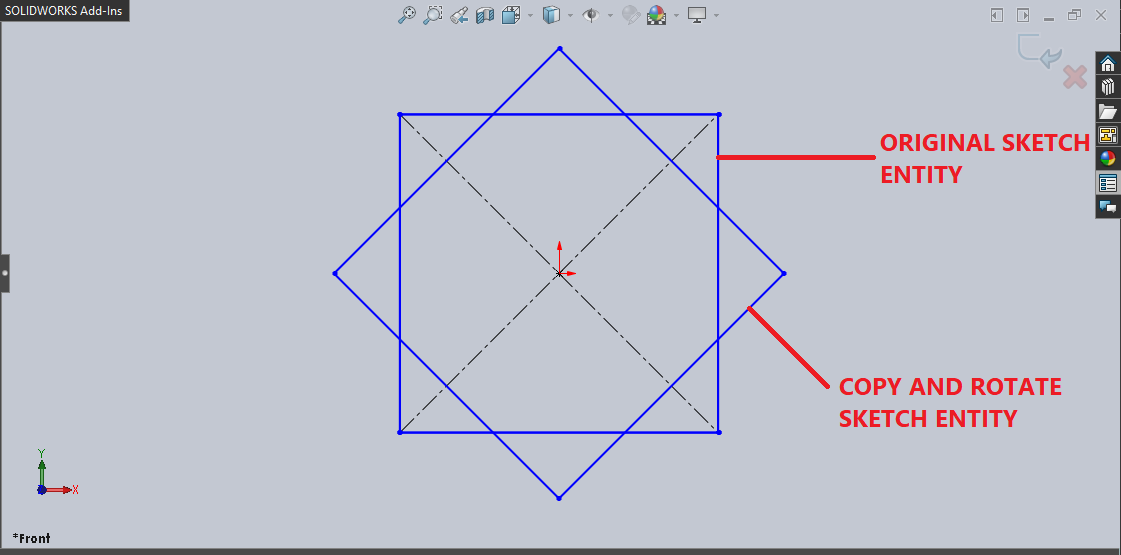
CASE 2 : Copy and Rotate Sketch Entities
In our code, if we want to Copy and Rotate Sketch Entities, then we need to use code sample as given below:
' Copy circle
swDoc.Extension.RotateOrCopy True, 2, True, 0, 0, 0, destinationCoOrdinateInXDir, destinationCoOrdinateInYDir, 0
In above code we Rotate Sketch Entities with:
-
Create Copy :
True -
Base Point :
0, 0, 0 -
Rotation Angle of Copied Entity :
45 DegreeAnti-clock wise.
If you want to rotate Clock-wise, then then use Negeative (-ve) value.
In above code we need to set following parameters:
-
Copy :
Trueto not create a copy. -
NumCopies : Number of copies you want to create to 2 which is itself.
-
KeepRelations :
Trueto keep sketch relations after Rotate or Copy operation. -
BaseX : X coordinate of the base point = 0
-
BaseY : Y coordinate of the base point = 0
-
BaseZ : Z coordinate of the base point = 0
Since we are creating sketch in X-Y plane, hence I used values mentioned in Destination Point Values sections of this post.
-
DestX : X coordinate of the destination = 0
-
DestY : Y coordinate of the destination point = 0
-
DestZ : Z coordinate of the destination point = 1
-
Rotation Angle : Angle of Rotation by which we rotate the selected sketch entities =
45 DegreeAnti-clock wise.
Example Images:
Below image shows before and after we Rotate Sketch Entitny.
Before Rotate Sketch Entitny
After Rotate Sketch Entitny
This is it !!!
I hope my efforts will helpful to someone!
If you found anything to add or update, please let me know on my e-mail.
Hope this post helps you to Rotate/Copy Sketch Entities with Solidworks VBA Macros.
For more such tutorials on Solidworks VBA Macro, do come to this blog after sometime.
If you like the post then please share it with your friends also.
Do let me know by you like this post or not!
Till then, Happy learning!!!