Insert Solidworks Sketch UI
I want to:
-
Create User Interface for Inserting Solidworks Sketch into Sketch Document.
-
Share method which allowed us to use ‘Properties and methods’ of ‘ViewModel’ as ‘IntelliSense’ in ‘XAML UI’.
-
We will reference previous articles for adding controls and services.
-
Hence reading previous WPF articles is highly suggested.
Demo Video
Below 🎬 video shows how to Insert Solidworks Sketch into Solidworks Document UI in Visual Studio 2022.
Insert Solidworks Sketch into Solidworks Document UI
Setting Project
We need to add some required UI changes as part of Project Setup.
Please follow below sections for this.
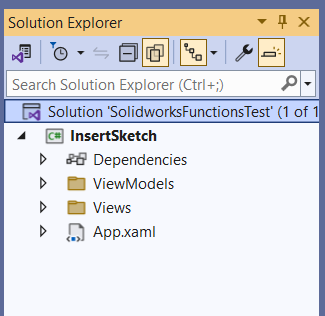
Add [Prism Project]
-
First, we add Prism Project for our requirement.
-
We already have an article where we add Prism Project.
-
Please see 🚀 Create Project section of 🚀 Open Syncfusion Chromeless Window article for creating New Prism project.
-
Please see below image for folder structure.
Add [Syncfusion Chromeless Window]
-
Now, we need to add “Syncfusion Chromeless Window” into our View.
-
We already have an article where we add “Syncfusion Chromeless Window” into our View.
-
Please see 🚀 Add Syncfusion Chromeless Window section of 🚀 Open Syncfusion Chromeless Window article for creating New Prism project.
Add [Design Time DataContext]
-
Now, we need to enable “IntelliSense” for our ViewModel.
-
This will enable us to see Public Properties and Methods of ViewModel class into our xaml file.
-
For that, first open “MainWindow.xaml” file.
-
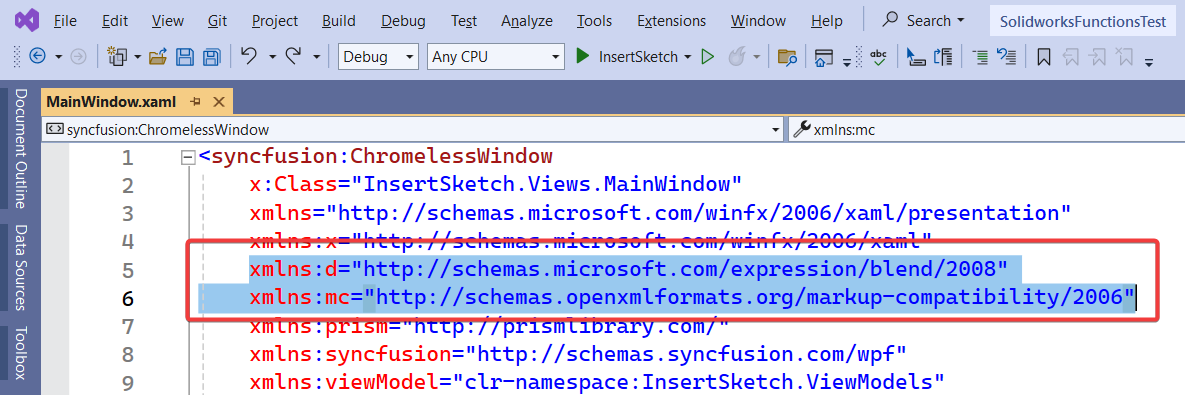
Now we need to add below namespace into “MainWindow.xaml” file.
xmlns:d="http://schemas.microsoft.com/expression/blend/2008"
xmlns:mc="http://schemas.openxmlformats.org/markup-compatibility/2006"
- Please see below 👇🏻 image for reference.
-
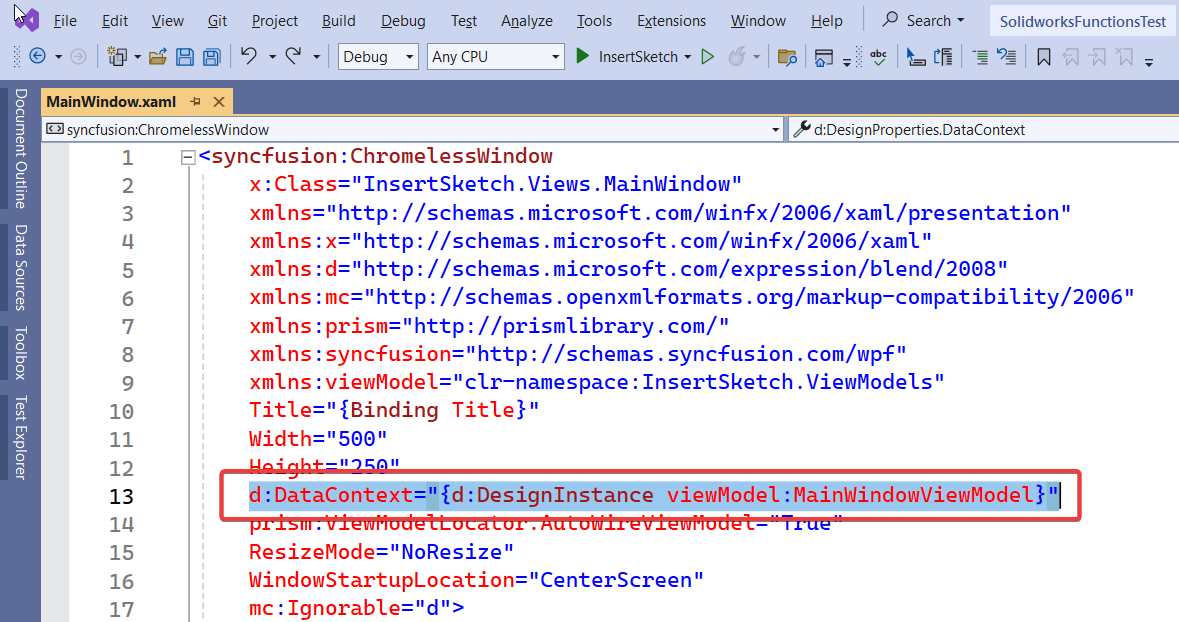
After adding namespace, we need define Design Time DataContext.
-
For our “MainWindow” view, DataContext is “MainWindowViewModel” class.
-
Hence, we also need to define “MainWindowViewModel” as Design Time DataContext.
-
For this we need to add below line.
d:DataContext="{d:DesignInstance viewModel:MainWindowViewModel}"
- Please see below 👇🏻 image for reference.
-
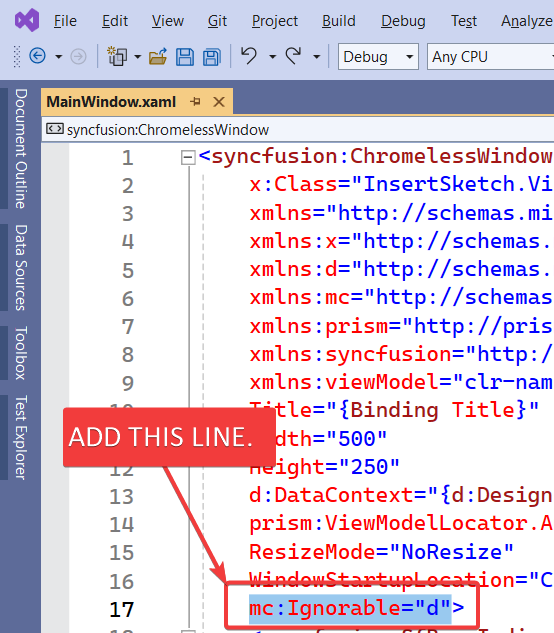
After setting Design Time DataContext, we need to ignore Design time values while executing.
-
For this we need to add below line.
mc:Ignorable="d"
- Please see below 👇🏻 image for reference.
- Full code same is give below.
<syncfusion:ChromelessWindow
    x:Class="InsertSketch.Views.MainWindow"
    xmlns="http://schemas.microsoft.com/winfx/2006/xaml/presentation"
    xmlns:x="http://schemas.microsoft.com/winfx/2006/xaml"
    xmlns:d="http://schemas.microsoft.com/expression/blend/2008"
    xmlns:mc="http://schemas.openxmlformats.org/markup-compatibility/2006"
    xmlns:prism="http://prismlibrary.com/"
    xmlns:syncfusion="http://schemas.syncfusion.com/wpf"
    xmlns:viewModel="clr-namespace:InsertSketch.ViewModels"
    Title="{Binding Title}"
    Width="500"
    Height="250"
    d:DataContext="{d:DesignInstance viewModel:MainWindowViewModel}"
    prism:ViewModelLocator.AutoWireViewModel="True"
    ResizeMode="NoResize"
    WindowStartupLocation="CenterScreen"
    mc:Ignorable="d">
-
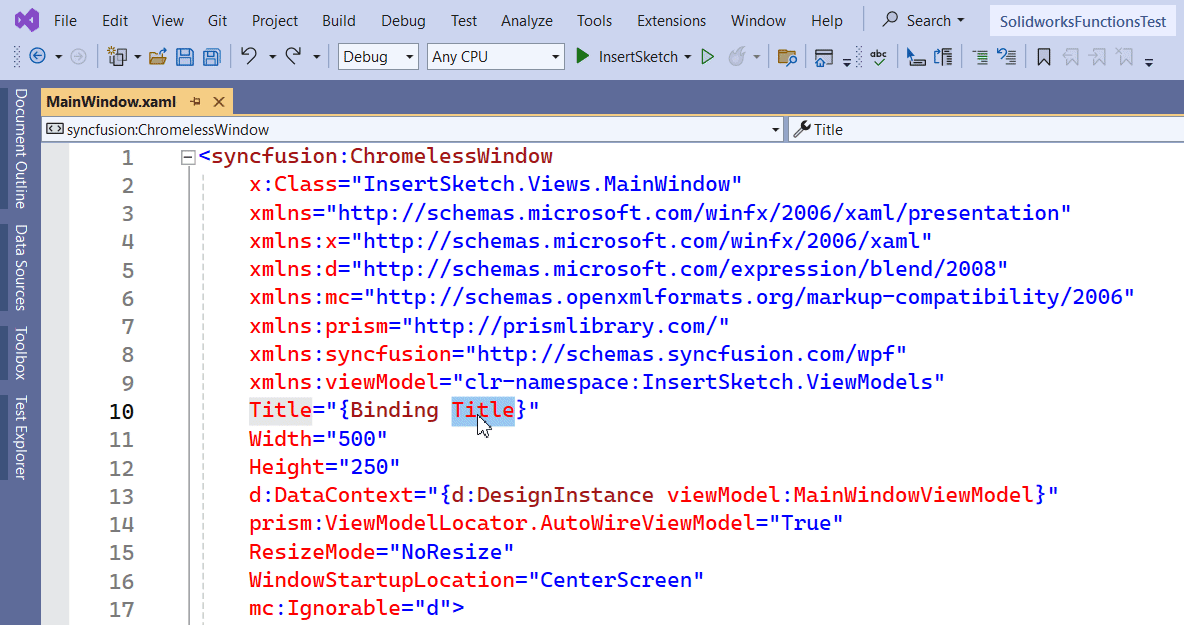
As an example to show, how IntelliSense work, just remove any existing Binding properties.
-
We remove
Titleproperty and re-add it. -
While adding, you will notice
Titleproperty of “MainWindowViewModel” in Blue color. -
Please see below 👇🏻 image for reference.
Add [Syncfusion Busy Indicator]
-
Now, we need to add “Syncfusion Busy Indicator” into our View.
-
We already have an article where we add “Syncfusion Busy Indicator” into our View.
-
Please see 🚀 Add Syncfusion Busy Indicator article for adding “Syncfusion Busy Indicator”.
Add Controls For UI
We will some Controls to arrange and show them in UI.
Please follow below section to add them.
Add [Grid]
-
First, we add
<Grid>tag inside<syncfusion:SfBusyIndicator>tag. -
Please see below 👇🏻 image for reference.
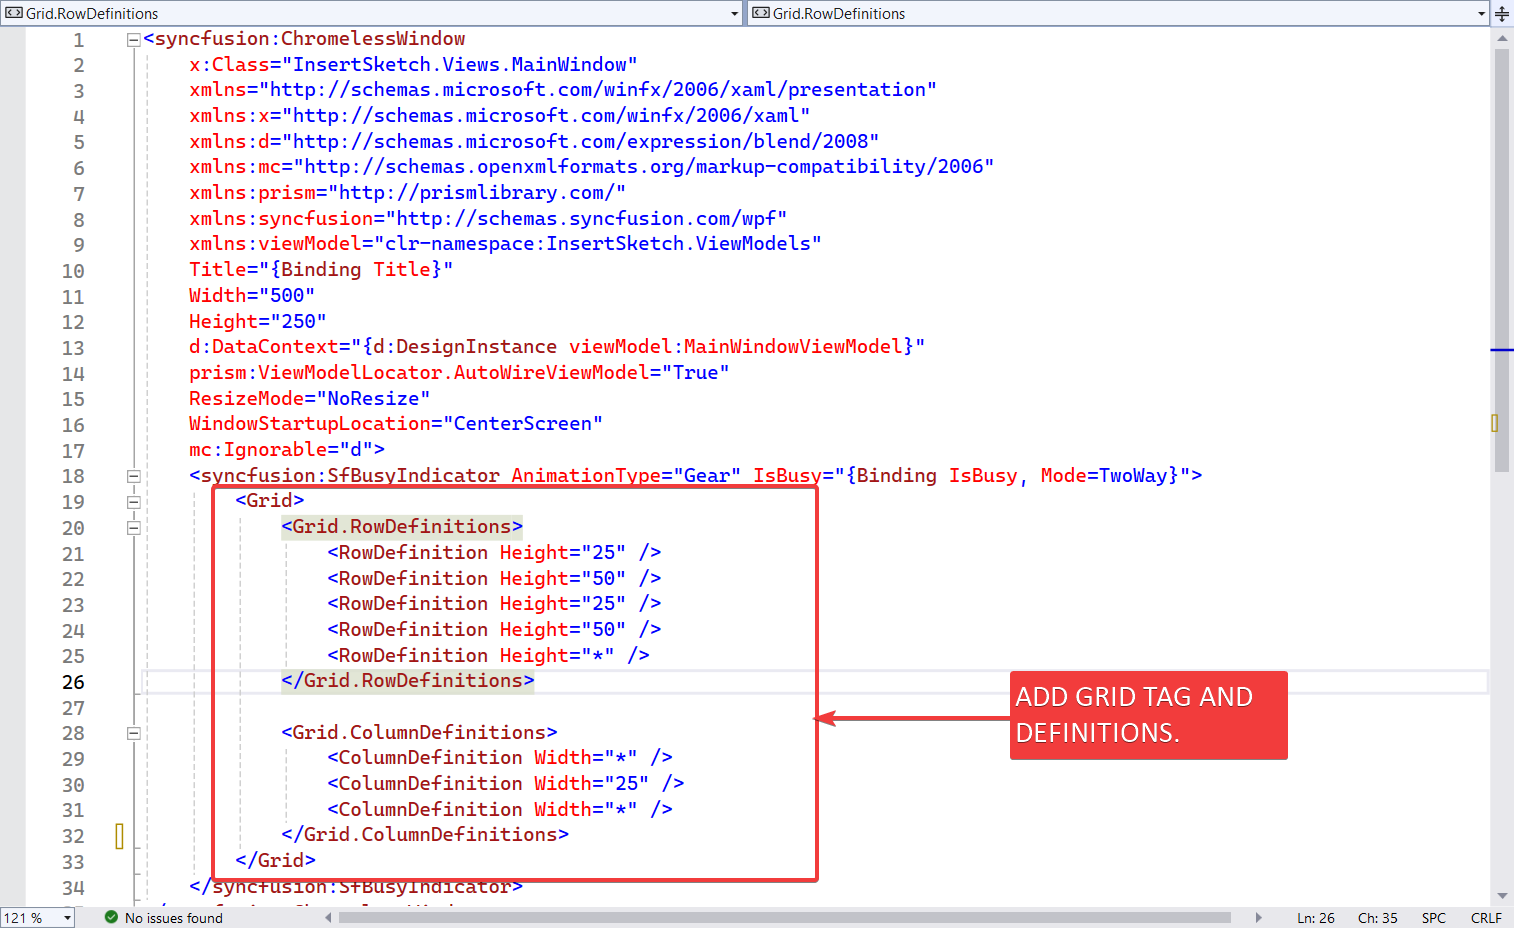
- Please see below 👇🏻 code sample for reference.
<syncfusion:ChromelessWindow
    x:Class="InsertSketch.Views.MainWindow"
    xmlns="http://schemas.microsoft.com/winfx/2006/xaml/presentation"
    xmlns:x="http://schemas.microsoft.com/winfx/2006/xaml"
    xmlns:d="http://schemas.microsoft.com/expression/blend/2008"
    xmlns:mc="http://schemas.openxmlformats.org/markup-compatibility/2006"
    xmlns:prism="http://prismlibrary.com/"
    xmlns:syncfusion="http://schemas.syncfusion.com/wpf"
    xmlns:viewModel="clr-namespace:InsertSketch.ViewModels"
    Title="{Binding Title}"
    Width="500"
    Height="250"
    d:DataContext="{d:DesignInstance viewModel:MainWindowViewModel}"
    prism:ViewModelLocator.AutoWireViewModel="True"
    ResizeMode="NoResize"
    WindowStartupLocation="CenterScreen"
    mc:Ignorable="d">

    <syncfusion:SfBusyIndicator
        AnimationType="Gear"
        IsBusy="{Binding IsBusy, Mode=TwoWay}">

        <Grid>
            <Grid.RowDefinitions>
                <RowDefinition Height="25" />
                <RowDefinition Height="50" />
                <RowDefinition Height="25" />
                <RowDefinition Height="50" />
                <RowDefinition Height="*" />
            </Grid.RowDefinitions>

            <Grid.ColumnDefinitions>
                <ColumnDefinition Width="*" />
                <ColumnDefinition Width="25" />
                <ColumnDefinition Width="*" />
            </Grid.ColumnDefinitions>
        </Grid>

    </syncfusion:SfBusyIndicator>

</syncfusion:ChromelessWindow>
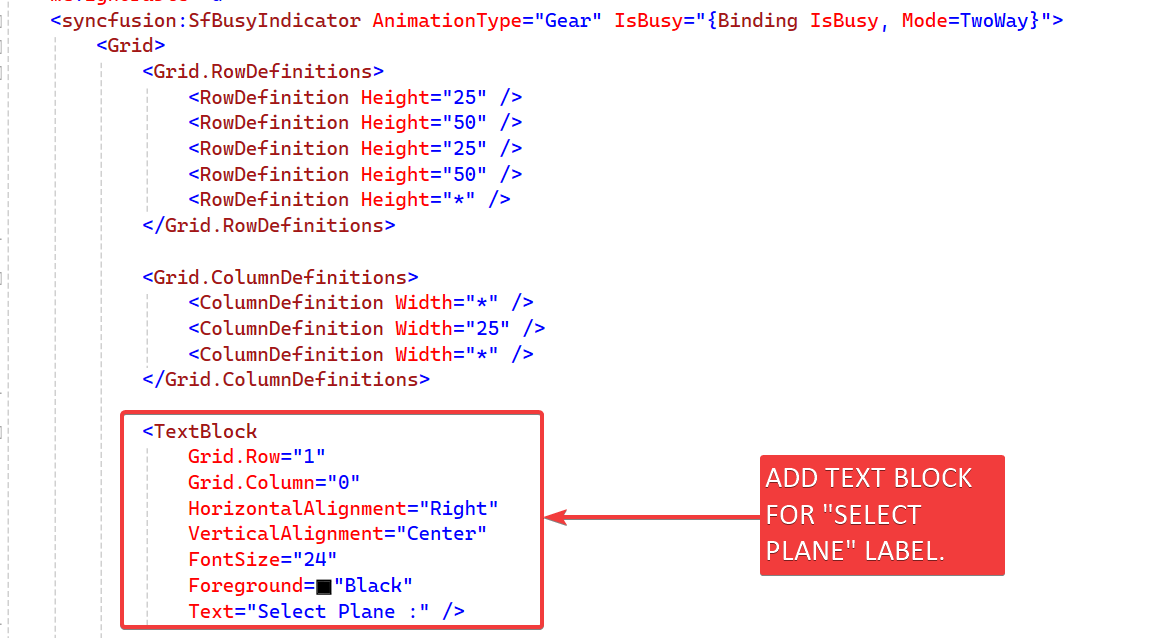
Add [TextBlock]
- Now add a Label for “Select Plane” as shown below.
<TextBlock
    Grid.Row="1"
    Grid.Column="0"
    HorizontalAlignment="Right"
    VerticalAlignment="Center"
    FontSize="24"
    Foreground="Black"
    Text="Select Plane :" />
- Please see below 👇🏻 image for reference.
- Please see below 👇🏻 full code sample for reference.
<syncfusion:ChromelessWindow
    x:Class="InsertSketch.Views.MainWindow"
    xmlns="http://schemas.microsoft.com/winfx/2006/xaml/presentation"
    xmlns:x="http://schemas.microsoft.com/winfx/2006/xaml"
    xmlns:d="http://schemas.microsoft.com/expression/blend/2008"
    xmlns:mc="http://schemas.openxmlformats.org/markup-compatibility/2006"
    xmlns:prism="http://prismlibrary.com/"
    xmlns:syncfusion="http://schemas.syncfusion.com/wpf"
    xmlns:viewModel="clr-namespace:InsertSketch.ViewModels"
    Title="{Binding Title}"
    Width="500"
    Height="250"
    d:DataContext="{d:DesignInstance viewModel:MainWindowViewModel}"
    prism:ViewModelLocator.AutoWireViewModel="True"
    ResizeMode="NoResize"
    WindowStartupLocation="CenterScreen"
    mc:Ignorable="d">

    <syncfusion:SfBusyIndicator
        AnimationType="Gear"
        IsBusy="{Binding IsBusy, Mode=TwoWay}">

        <Grid>
            <Grid.RowDefinitions>
                <RowDefinition Height="25" />
                <RowDefinition Height="50" />
                <RowDefinition Height="25" />
                <RowDefinition Height="50" />
                <RowDefinition Height="*" />
            </Grid.RowDefinitions>

            <Grid.ColumnDefinitions>
                <ColumnDefinition Width="*" />
                <ColumnDefinition Width="25" />
                <ColumnDefinition Width="*" />
            </Grid.ColumnDefinitions>

            <TextBlock
                Grid.Row="1"
                Grid.Column="0"
                HorizontalAlignment="Right"
                VerticalAlignment="Center"
                FontSize="24"
                Foreground="Black"
                Text="Select Plane :" />

        </Grid>

    </syncfusion:SfBusyIndicator>

</syncfusion:ChromelessWindow>
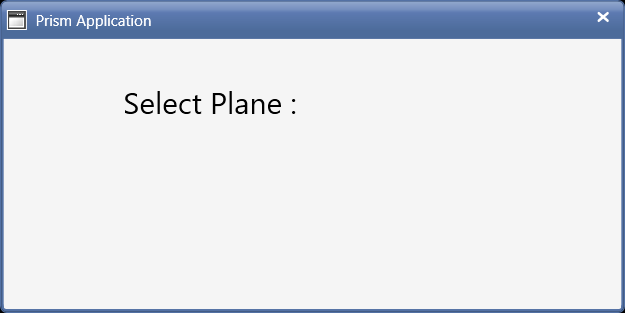
- Please see below 👇🏻 image as how does this label look in application.
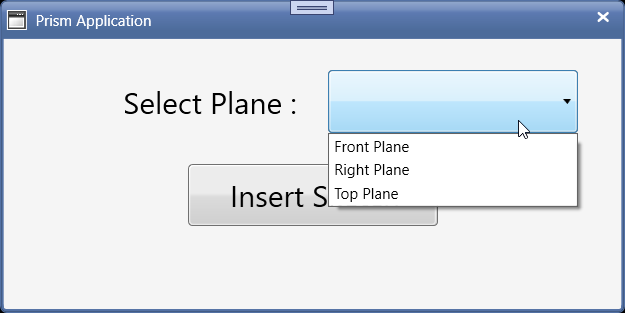
Add [syncfusion:ComboBoxAdv]
-
Now we add
syncfusion:ComboBoxAdvfor showing list of Planes. -
Please see below 👇🏻 image for reference.
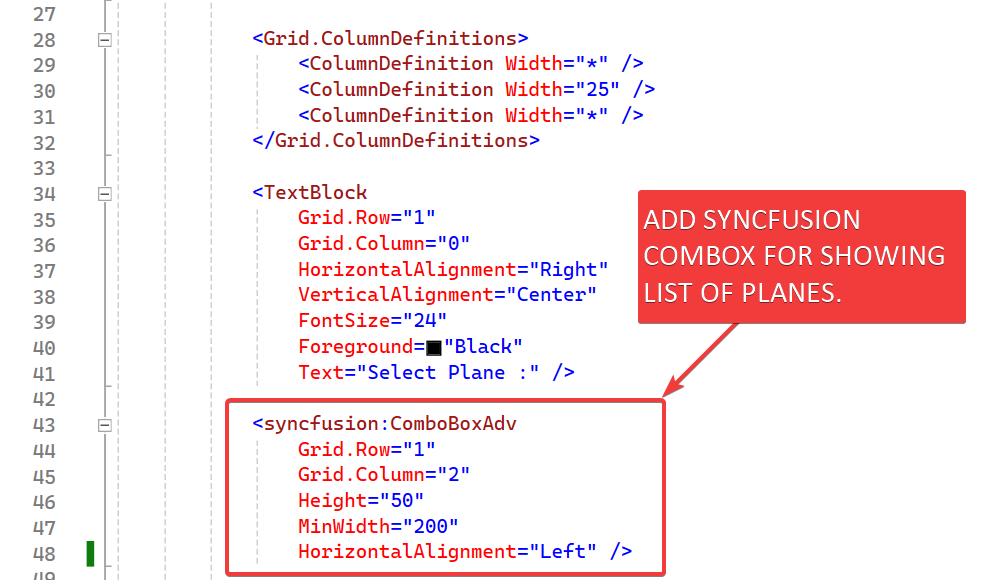
- Please see below 👇🏻 code sample for reference.
<syncfusion:ChromelessWindow
    x:Class="InsertSketch.Views.MainWindow"
    xmlns="http://schemas.microsoft.com/winfx/2006/xaml/presentation"
    xmlns:x="http://schemas.microsoft.com/winfx/2006/xaml"
    xmlns:d="http://schemas.microsoft.com/expression/blend/2008"
    xmlns:mc="http://schemas.openxmlformats.org/markup-compatibility/2006"
    xmlns:prism="http://prismlibrary.com/"
    xmlns:syncfusion="http://schemas.syncfusion.com/wpf"
    xmlns:viewModel="clr-namespace:InsertSketch.ViewModels"
    Title="{Binding Title}"
    Width="500"
    Height="250"
    d:DataContext="{d:DesignInstance viewModel:MainWindowViewModel}"
    prism:ViewModelLocator.AutoWireViewModel="True"
    ResizeMode="NoResize"
    WindowStartupLocation="CenterScreen"
    mc:Ignorable="d">

    <syncfusion:SfBusyIndicator
        AnimationType="Gear"
        IsBusy="{Binding IsBusy, Mode=TwoWay}">

        <Grid>
            <Grid.RowDefinitions>
                <RowDefinition Height="25" />
                <RowDefinition Height="50" />
                <RowDefinition Height="25" />
                <RowDefinition Height="50" />
                <RowDefinition Height="*" />
            </Grid.RowDefinitions>

            <Grid.ColumnDefinitions>
                <ColumnDefinition Width="*" />
                <ColumnDefinition Width="25" />
                <ColumnDefinition Width="*" />
            </Grid.ColumnDefinitions>

            <TextBlock
                Grid.Row="1"
                Grid.Column="0"
                HorizontalAlignment="Right"
                VerticalAlignment="Center"
                FontSize="24"
                Foreground="Black"
                Text="Select Plane :" />

            <syncfusion:ComboBoxAdv
                Grid.Row="1"
                Grid.Column="2"
                Height="50"
                MinWidth="200"
                HorizontalAlignment="Left" />

        </Grid>

    </syncfusion:SfBusyIndicator>

</syncfusion:ChromelessWindow>
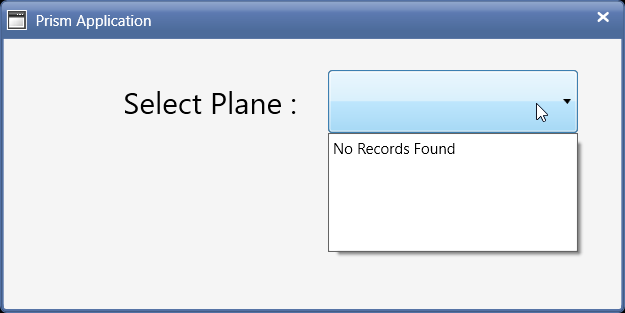
- Please see below 👇🏻 image as how Plane list look in application.
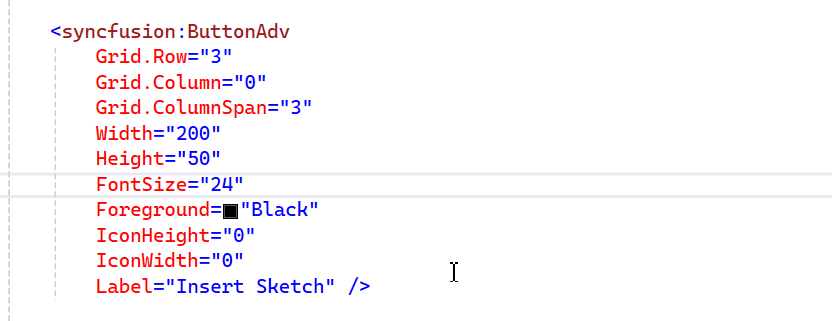
Add [syncfusion:ButtonAdv]
-
Now we add
syncfusion:ButtonAdvbutton. -
This button execute function for Inserting Sketch into Solidworks Part Document.
-
Please see below 👇🏻 image for reference.
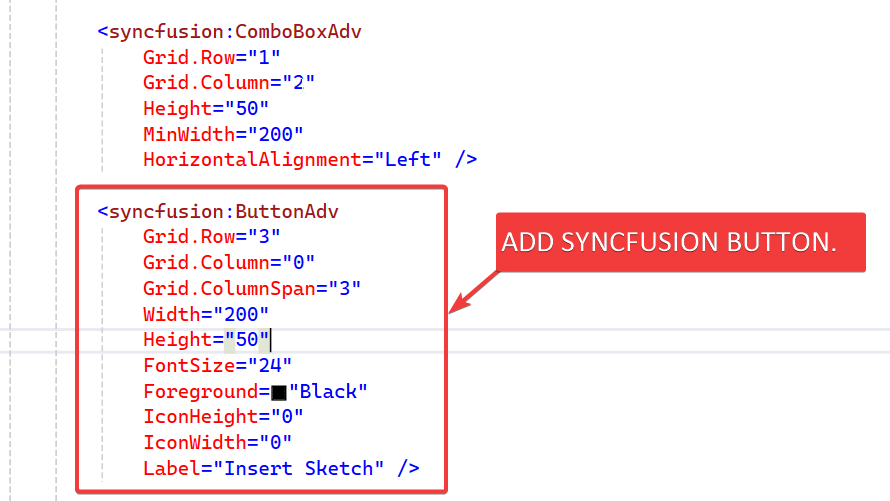
- Please see below 👇🏻 code sample for reference.
<syncfusion:ChromelessWindow
    x:Class="InsertSketch.Views.MainWindow"
    xmlns="http://schemas.microsoft.com/winfx/2006/xaml/presentation"
    xmlns:x="http://schemas.microsoft.com/winfx/2006/xaml"
    xmlns:d="http://schemas.microsoft.com/expression/blend/2008"
    xmlns:mc="http://schemas.openxmlformats.org/markup-compatibility/2006"
    xmlns:prism="http://prismlibrary.com/"
    xmlns:syncfusion="http://schemas.syncfusion.com/wpf"
    xmlns:viewModel="clr-namespace:InsertSketch.ViewModels"
    Title="{Binding Title}"
    Width="500"
    Height="250"
    d:DataContext="{d:DesignInstance viewModel:MainWindowViewModel}"
    prism:ViewModelLocator.AutoWireViewModel="True"
    ResizeMode="NoResize"
    WindowStartupLocation="CenterScreen"
    mc:Ignorable="d">

    <syncfusion:SfBusyIndicator
        AnimationType="Gear"
        IsBusy="{Binding IsBusy, Mode=TwoWay}">

        <Grid>
            <Grid.RowDefinitions>
                <RowDefinition Height="25" />
                <RowDefinition Height="50" />
                <RowDefinition Height="25" />
                <RowDefinition Height="50" />
                <RowDefinition Height="*" />
            </Grid.RowDefinitions>

            <Grid.ColumnDefinitions>
                <ColumnDefinition Width="*" />
                <ColumnDefinition Width="25" />
                <ColumnDefinition Width="*" />
            </Grid.ColumnDefinitions>

            <TextBlock
                Grid.Row="1"
                Grid.Column="0"
                HorizontalAlignment="Right"
                VerticalAlignment="Center"
                FontSize="24"
                Foreground="Black"
                Text="Select Plane :" />

            <syncfusion:ComboBoxAdv
                Grid.Row="1"
                Grid.Column="2"
                Height="50"
                MinWidth="200"
                HorizontalAlignment="Left" />

            <syncfusion:ButtonAdv
                Grid.Row="3"
                Grid.Column="0"
                Grid.ColumnSpan="3"
                Width="200"
                Height="50"
                FontSize="24"
                Foreground="Black"
                IconHeight="0"
                IconWidth="0"
                Label="Insert Sketch" />

        </Grid>

    </syncfusion:SfBusyIndicator>

</syncfusion:ChromelessWindow>
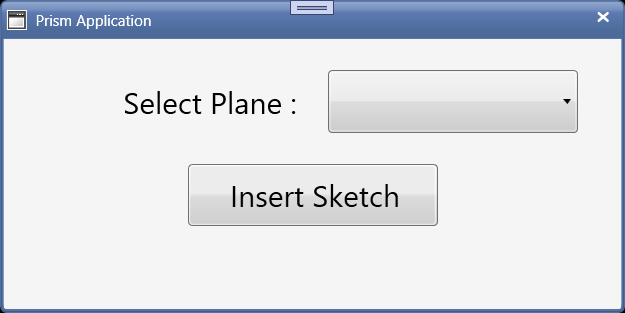
- Please see below 👇🏻 image as how Insert Sketch looks in application.
Set Message Services
In this section, we setup Message Services to communicate in our application.
For this please follow below 👇🏻 sections.
Add Message Services
-
Now, we need to “Add Message Services” into our application.
-
We already have an article where we “Add Message Services” into our application.
-
Please see 🚀 Add Service for Messaging in application section of 🚀 Add Message Service article for adding Message Services.
-
Following Services added:
ConfirmationMessagesServiceInformationMessagesServiceErrorMessagesService
-
Please see below 👇🏻 code sample for reference.
using Prism.Events;

namespace InsertSketch.Services
{
    internal class ConfirmationMessagesService : PubSubEvent<string> { }
    internal class InformationMessagesService : PubSubEvent<string> { }
    internal class ErrorMessagesService : PubSubEvent<string> { }
}
Register Message Services
-
Now, we need to “Register Message Services” into our application.
-
We already have an article where we “Register Message Services” into our application.
-
Please see 🚀 Register Services section of 🚀 Add Message Service article for adding Message Services.
-
Please see below 👇🏻 code sample for reference.
using InsertSketch.Services;
using InsertSketch.ViewModels;
using Prism.Events;
using Syncfusion.Windows.Shared;
using System.Windows;

namespace InsertSketch.Views
{
    /// <summary>
    /// Interaction logic for MainWindow.xaml
    /// </summary>
    public partial class MainWindow : ChromelessWindow
    {
        private readonly IEventAggregator eventAggregator;

        public MainWindow(IEventAggregator eventAggregator)
        {
            InitializeComponent();
            this.eventAggregator = eventAggregator;
            this.eventAggregator.GetEvent<ConfirmationMessagesService>()
                                .Subscribe(ConfirmationMessages);
            this.eventAggregator.GetEvent<InformationMessagesService>()
                                .Subscribe(InformationMessages);
            this.eventAggregator.GetEvent<ErrorMessagesService>()
                                .Subscribe(ErrorMessages);
        }

        private void ConfirmationMessages(string messageToShow)
        {
            MessageBox.Show(
                messageToShow,
                "Confirmation",
                MessageBoxButton.YesNo,
                MessageBoxImage.Question);
        }

        private void InformationMessages(string messageToShow)
        {
            MessageBox.Show(
                messageToShow,
                "Information",
                MessageBoxButton.OK,
                MessageBoxImage.Information);
        }

        private void ErrorMessages(string messageToShow)
        {
            MessageBox.Show(
                messageToShow,
                "Error",
                MessageBoxButton.OK,
                MessageBoxImage.Error);
        }
    }
}
Understand Message Services
-
If you want to “understand Message Services”, then please visit below article.
-
Reference Article: 🚀 Add Message Service
Update ViewModel
-
Now we need to “add Properties and Methods” for “Binding” with our view.
- View:
MainWindow - ViewModel:
MainWindowViewModel
- View:
-
Please see below 👇🏻 image for “Properties and Methods” required.
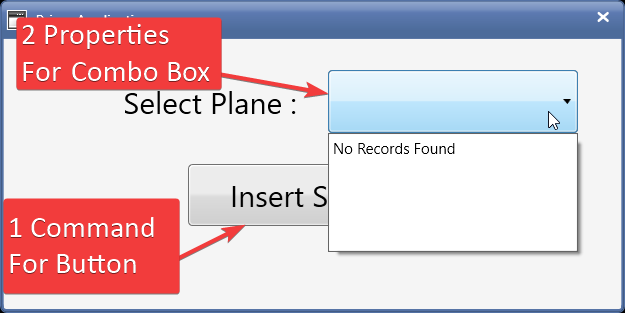
Add [Properties]
-
We need to 2 “Properties” for “Syncfusion ComboBox”.
- For List of Planes to show in drop down.
- For Selected Item in drop down.
-
Please see below 👇🏻 code sample for “Properties” in
MainWindowViewModel.
private List<string> _planeNames;
public List<string> PlaneNames
{
    get { return _planeNames; }
    set { SetProperty(ref _planeNames, value); }
}

private string _selectedPlane;
public string SelectedPlane
{
    get { return _selectedPlane; }
    set { SetProperty(ref _selectedPlane, value); }
}
- Please see below 👇🏻 image for “Properties and Methods” required.
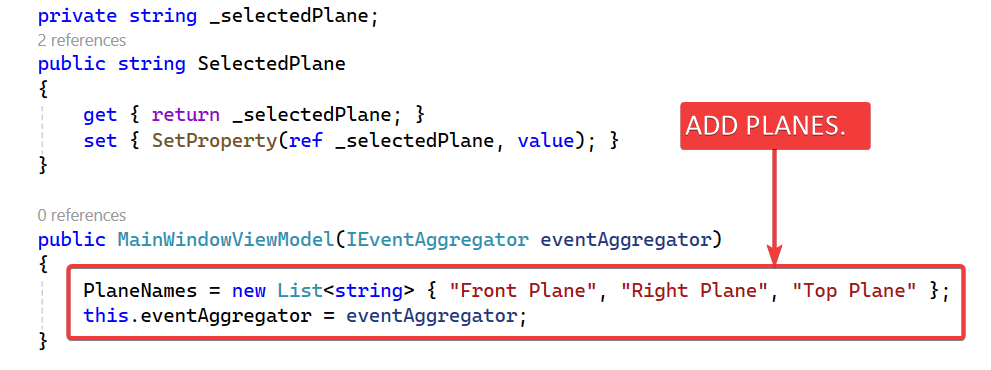
-
Now we need to fill, “Plane Names” in
SelectedPlanevariable. -
We add “Plane Names” in Constructor.
-
Please see below 👇🏻 code sample for adding “Plane Names” in Constructor.
public MainWindowViewModel(IEventAggregator eventAggregator)
{
    PlaneNames = new List<string>
    {
        "Front Plane",
        "Right Plane",
        "Top Plane"
    };

    this.eventAggregator = eventAggregator;
}
- Please see below 👇🏻 image for adding “Plane Names” in Constructor.
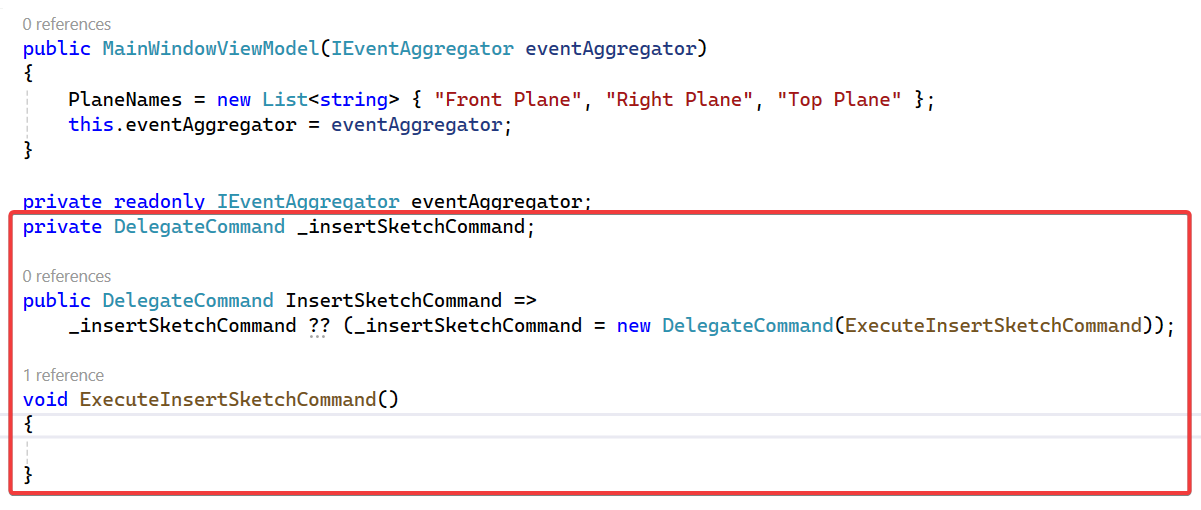
Add [Prism Command]
-
We need 1 Prism Command for syncfusion Button.
-
This command will be responsible for Inserting Sketch in Solidworks Part Document.
-
Please see below 👇🏻 code sample for adding “Prism Command” in
MainWindowViewModel.
private DelegateCommand _insertSketchCommand;

public DelegateCommand InsertSketchCommand =>
    _insertSketchCommand ?? (_insertSketchCommand =
        new DelegateCommand(ExecuteInsertSketchCommand));

void ExecuteInsertSketchCommand()
{
    // TODO: Insert sketch logic
}
- Please see below 👇🏻 image for adding “Prism Command” in
MainWindowViewModel.
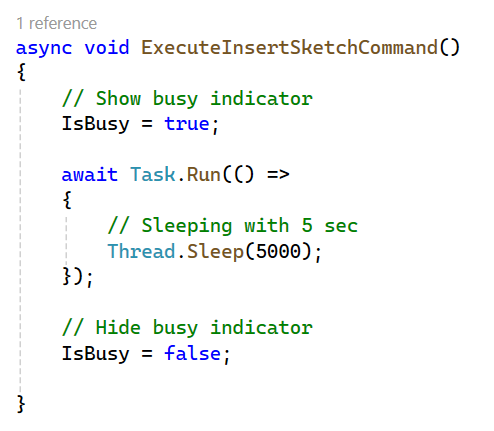
Add Code To Function
-
Now we will add some code
ExecuteInsertSketchCommandfunction. -
We already used this code for in various articles.
-
Please see below 👇🏻 code sample for waiting code to add.
private DelegateCommand _insertSketchCommand;

public DelegateCommand InsertSketchCommand =>
    _insertSketchCommand ?? (_insertSketchCommand =
        new DelegateCommand(ExecuteInsertSketchCommand));

async void ExecuteInsertSketchCommand()
{
    // Show busy indicator
    IsBusy = true;

    await Task.Run(() =>
    {
        // Simulate long-running operation (5 seconds)
        Thread.Sleep(5000);
    });

    // Hide busy indicator
    IsBusy = false;
}
- Please see below 👇🏻 image for waiting code to add.
<syncfusion:ComboBoxAdv
    Grid.Row="1"
    Grid.Column="2"
    Height="50"
    MinWidth="200"
    HorizontalAlignment="Left" />
Add [Bindings]
In this section we will add Bindings to Syncfusion Combo Box and Syncfusion Button.
Add [Property Binding]
-
We need to Bind previously created “Properties” with “Syncfusion ComboBox”.
-
Please see below 👇🏻 image for adding “Binding Properties”.
- Please see below 👇🏻 code for adding “Binding Properties”.
<syncfusion:ComboBoxAdv
    Grid.Row="1"
    Grid.Column="2"
    Height="50"
    MinWidth="200"
    HorizontalAlignment="Left"
    ItemsSource="{Binding PlaneNames}"
    SelectedItem="{Binding SelectedPlane, Mode=TwoWay, UpdateSourceTrigger=PropertyChanged}" />
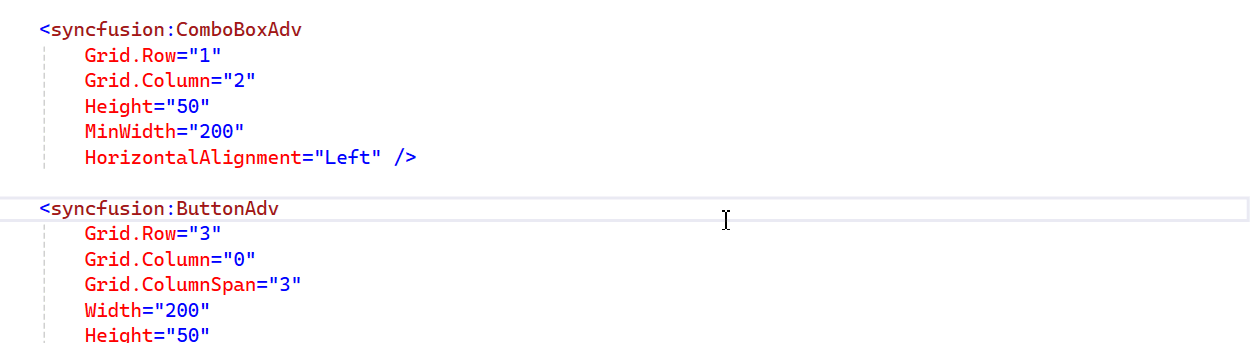
Add [Command Binding]
-
We need to Bind previously created “Command” with “Syncfusion Button”.
-
Please see below 👇🏻 image for adding “Command”.
- Please see below 👇🏻 code for adding “Command”.
<syncfusion:ButtonAdv
    Grid.Row="3"
    Grid.Column="0"
    Grid.ColumnSpan="3"
    Width="200"
    Height="50"
    Command="{Binding InsertSketchCommand}"
    FontSize="24"
    Foreground="Black"
    IconHeight="0"
    IconWidth="0"
    Label="Insert Sketch" />
Update [Syncfusion ComboBox]
-
We need to update Syncfusion ComboBox for following reasons.
-
There is no Default value selected in Syncfusion ComboBox.
-
Font Size of Text in Dropdown in very small.
-
Please see below 👇🏻 image for reference.
Let us handle them 1 by 1.
Add Default Value
-
For adding Default Value, we need to define
SelectedIndexproperty ofsyncfusion:ComboBoxAdv. -
Please see below 👇🏻 image for adding Default Value.
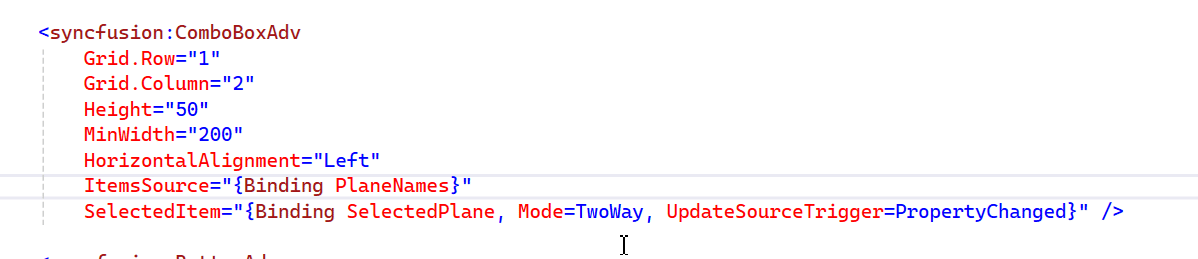
- Please see below 👇🏻 code for adding Default Value.
<syncfusion:ComboBoxAdv
    Grid.Row="1"
    Grid.Column="2"
    Height="50"
    MinWidth="200"
    HorizontalAlignment="Left"
    ItemsSource="{Binding PlaneNames}"
    SelectedIndex="0"
    SelectedItem="{Binding SelectedPlane,
                          Mode=TwoWay,
                          UpdateSourceTrigger=PropertyChanged}" />
Update Font Size
-
For update Font Size of Text in Dropdown, we need to define
ItemTemplateofsyncfusion:ComboBoxAdv. -
Please see below 👇🏻 image for adding Default Value.
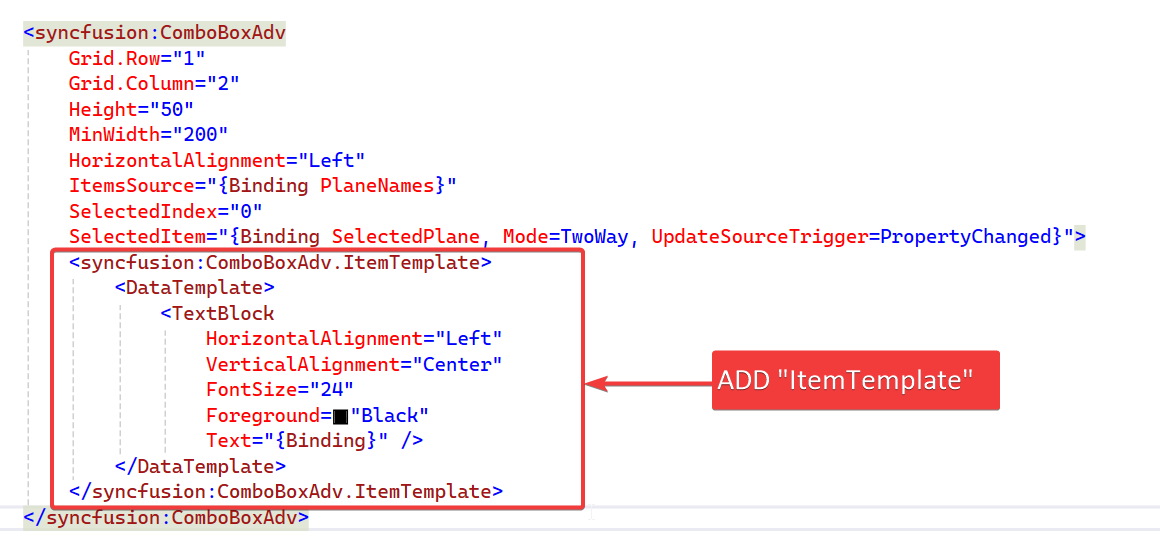
- Please see below 👇🏻 code for adding Default Value.
<syncfusion:ComboBoxAdv
    Grid.Row="1"
    Grid.Column="2"
    Height="50"
    MinWidth="200"
    HorizontalAlignment="Left"
    ItemsSource="{Binding PlaneNames}"
    SelectedIndex="0"
    SelectedItem="{Binding SelectedPlane,
                          Mode=TwoWay,
                          UpdateSourceTrigger=PropertyChanged}" />
Final Result
Now we run the application as shown in below 👇🏻 image.
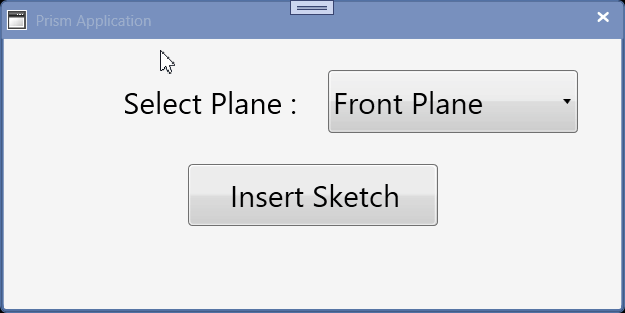
Now UI part is completed for Inserting Sketch in Solidworks Document in WPF Prism Application.
This is it !!!
I hope my efforts will helpful to someone!
If you found anything to add or update, please let me know on my e-mail.
Hope this post helps you to Inserting Sketch in Solidworks Document UI.
If you like the post then please share it with your friends also.
Do let me know by you like this post or not!
Till then, Happy learning!!!