Delete Selected Sketch UI
Objective
I want to:
- Delete Selected Sketch in Solidworks Part Document.
Important Note:
-
We will use same setup as done in 🚀Insert Solidworks Sketch UI.
-
Hence reading previous 🚀Insert Solidworks Sketch UI artice is highly recommended.
Demo Video
Below 🎬 video shows how to Delete Sketch UI in Visual Studio 2022.
Setting Project
We need to add some required UI changes as part of Project Setup.
Please follow below sections for this.
Add [Prism Project]
-
First, we add Prism Project for our requirement.
-
We already have an article where we add Prism Project.
-
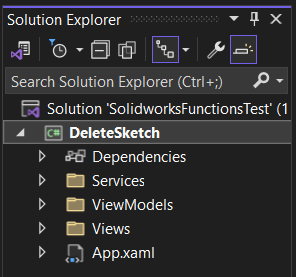
Please see 🚀 Create Project section of 🚀 Open Syncfusion Chromeless Window article for creating New Prism project.
-
Please see below image for folder structure.
Add [Syncfusion Chromeless Window]
-
Now, we need to add “Syncfusion Chromeless Window” into our View.
-
We already have an article where we add “Syncfusion Chromeless Window” into our View.
-
Please see 🚀 Add Syncfusion Chromeless Window section of 🚀 Open Syncfusion Chromeless Window article for creating New Prism project.
Add [Design Time DataContext]
-
In previous 🚀Add [Design Time DataContext] section of 🚀Insert Solidworks Sketch UI article, this section is already explained.
-
Please visit 🚀Add [Design Time DataContext] section of 🚀Insert Solidworks Sketch UI article for more detail on this section.
Add [Syncfusion Busy Indicator]
-
Now, we need to add “Syncfusion Busy Indicator” into our View.
-
We already have an article where we add “Syncfusion Busy Indicator” into our View.
-
Please see 🚀 Add Syncfusion Busy Indicator article for adding “Syncfusion Busy Indicator”.
Add Message Services
-
Now, we need to “Add Message Services” into our application.
-
We already have an article where we “Add Message Services” into our application.
-
Please see 🚀 Add Service for Messaging in application section of 🚀 Add Message Service article for adding Message Services.
Register Message Services
-
Now, we need to “Register Message Services” into our application.
-
We already have an article where we “Register Message Services” into our application.
-
Please see 🚀 Register Services section of 🚀 Add Message Service article for adding Message Services.
Understand Message Services
-
If you want to “understand Message Services”, then please visit below article.
-
Reference Article: 🚀 Add Message Service
Add [Solidworks References]
-
Now, we need to “Add [Solidworks References]” into our application.
-
We already have an article where we “Add [Solidworks References]” into our application.
-
Please see 🚀 Add [Solidworks References] section of 🚀 SOLIDWORKS C# API - Edit Solidworks Sketch article for Adding [Solidworks References].
Add Constructor
-
Now, we need to Add Constructor into our application.
-
We already have an article where we Add Constructor into our application.
-
Please see 🚀 Add Constructor section of 🚀 SOLIDWORKS C# API - Change Sketch Name article for Adding Constructor.
Add Private Fields
-
Now, we need to Add Private Fields into our application.
-
We already have an article where we Add Private Fields into our application.
-
Please see 🚀 Add Private Fields section of 🚀 SOLIDWORKS C# API - Change Sketch Name article for Adding Constructor.
Add Controls For UI
We will some Controls to arrange and show them in UI.
Please follow below section to add them.
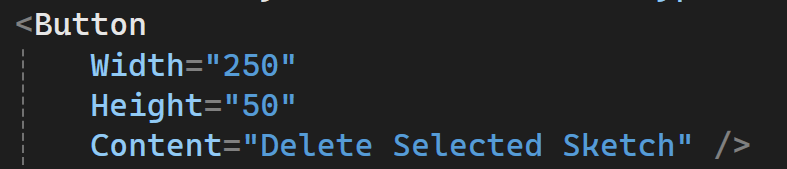
Add [Button]
-
Now we add
<Button>tag inside<syncfusion:SfBusyIndicator>tag.. -
This button execute function for Delete selected Solidworks Sketch.
-
Please see below 👇🏻 image for reference.
- Please see below 👇🏻 code sample for reference.
<syncfusion:ChromelessWindow
    x:Class="DeleteSketch.Views.MainWindow"
    xmlns="http://schemas.microsoft.com/winfx/2006/xaml/presentation"
    xmlns:x="http://schemas.microsoft.com/winfx/2006/xaml"
    xmlns:d="http://schemas.microsoft.com/expression/blend/2008"
    xmlns:mc="http://schemas.openxmlformats.org/markup-compatibility/2006"
    xmlns:prism="http://prismlibrary.com/"
    xmlns:syncfusion="http://schemas.syncfusion.com/wpf"
    xmlns:viewmodel="clr-namespace:DeleteSketch.ViewModels"
    Title="{Binding Title}"
    Width="525"
    Height="350"
    d:DataContext="{d:DesignInstance viewmodel:MainWindowViewModel}"
    prism:ViewModelLocator.AutoWireViewModel="True"
    WindowStartupLocation="CenterScreen"
    mc:Ignorable="d">
    <syncfusion:SfBusyIndicator AnimationType="Gear" IsBusy="{Binding IsBusy, Mode=TwoWay}">
        <Button
            Width="250"
            Height="50"
            Content="Delete Selected Sketch" />
    </syncfusion:SfBusyIndicator>
</syncfusion:ChromelessWindow>
- Please see below 👇🏻 image as how Insert Sketch looks in application.
Update ViewModel
-
Now we need to “add Properties and Methods” for “Binding” with our view.
- View:
MainWindow - ViewModel:
MainWindowViewModel
- View:
-
Please see below 👇🏻 image for “Properties and Methods” required.
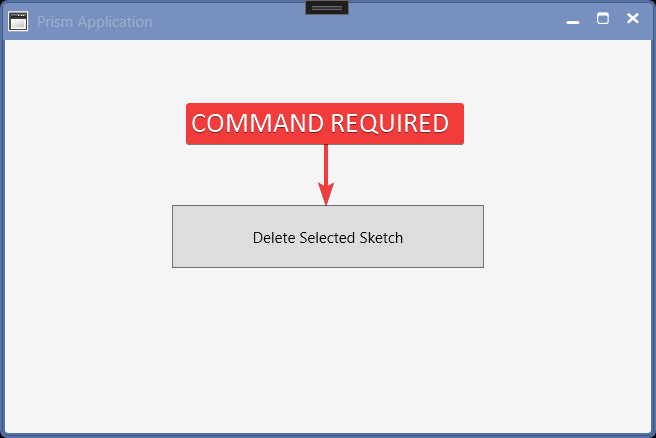
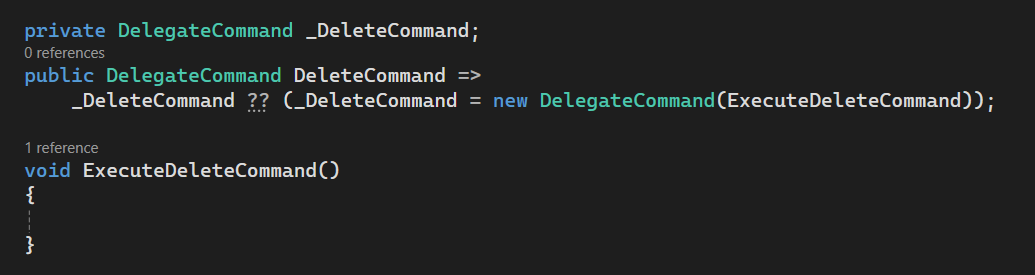
Add [Prism Command]
-
We need 1 Prism Command for Delete Sketch Button.
-
This command will be responsible for Deleting Sketch in Solidworks Part Document.
-
Please see below 👇🏻 code sample for adding “Prism Command” in
MainWindowViewModel.
private DelegateCommand _DeleteCommand;

public DelegateCommand DeleteCommand =>
    _DeleteCommand ?? (_DeleteCommand = new DelegateCommand(ExecuteDeleteCommand));

void ExecuteDeleteCommand()
{

}
- Please see below 👇🏻 image for adding “Prism Command” in
MainWindowViewModel.
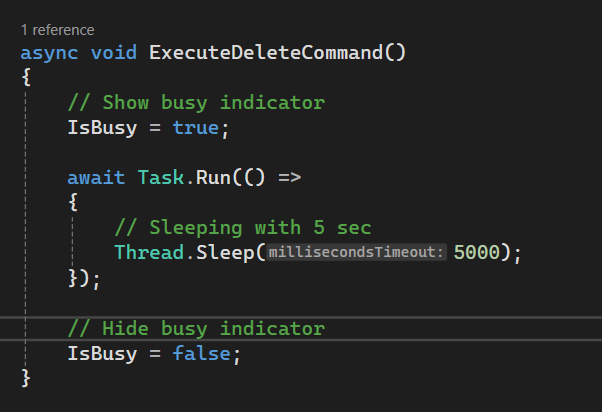
Add Code To Function
-
Now we will add some code
ExecuteDeleteCommandfunction. -
We already used this code for in various articles.
-
Please see below 👇🏻 code sample for waiting code to add.
private DelegateCommand _DeleteCommand;

public DelegateCommand DeleteCommand =>
    _DeleteCommand ?? (_DeleteCommand = new DelegateCommand(ExecuteDeleteCommand));

async void ExecuteDeleteCommand()
{
    // Show busy indicator
    IsBusy = true;

    await Task.Run(() =>
    {
        // Sleeping with 5 sec
        Thread.Sleep(5000);
    });

    // Hide busy indicator
    IsBusy = false;
}
- Please see below 👇🏻 image for waiting code to add.
Add [Command Binding]
-
We need to Bind previously created “Command” with “WPF Button”.
-
Please see below 👇🏻 image for adding “Command”.
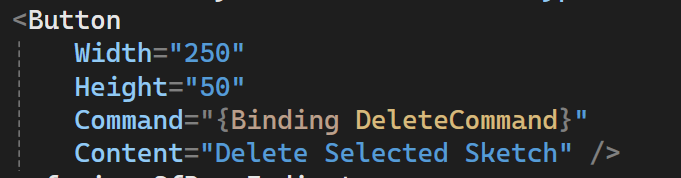
- Please see below 👇🏻 code for adding “Command”.
<Button
    Width="250"
    Height="50"
    Command="{Binding DeleteCommand}"
    Content="Delete Selected Sketch" />
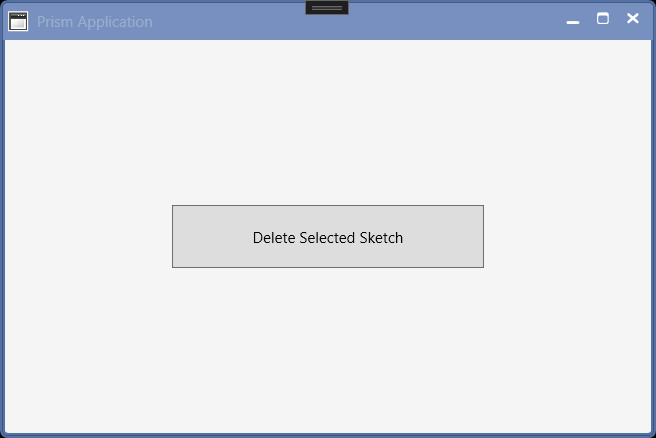
Final Result
Now we run the application as shown in below 👇🏻 image.

Now we are able to Delete Solidworks Sketch in MVVM pattern successfully.
This is it !!!
I hope my efforts will helpful to someone!
If you found anything to add or update, please let me know on my e-mail.
Hope this post helps you to Delete Solidworks Sketch in WPF application.
If you like the post then please share it with your friends also.
Do let me know by you like this post or not!
Till then, Happy learning!!!