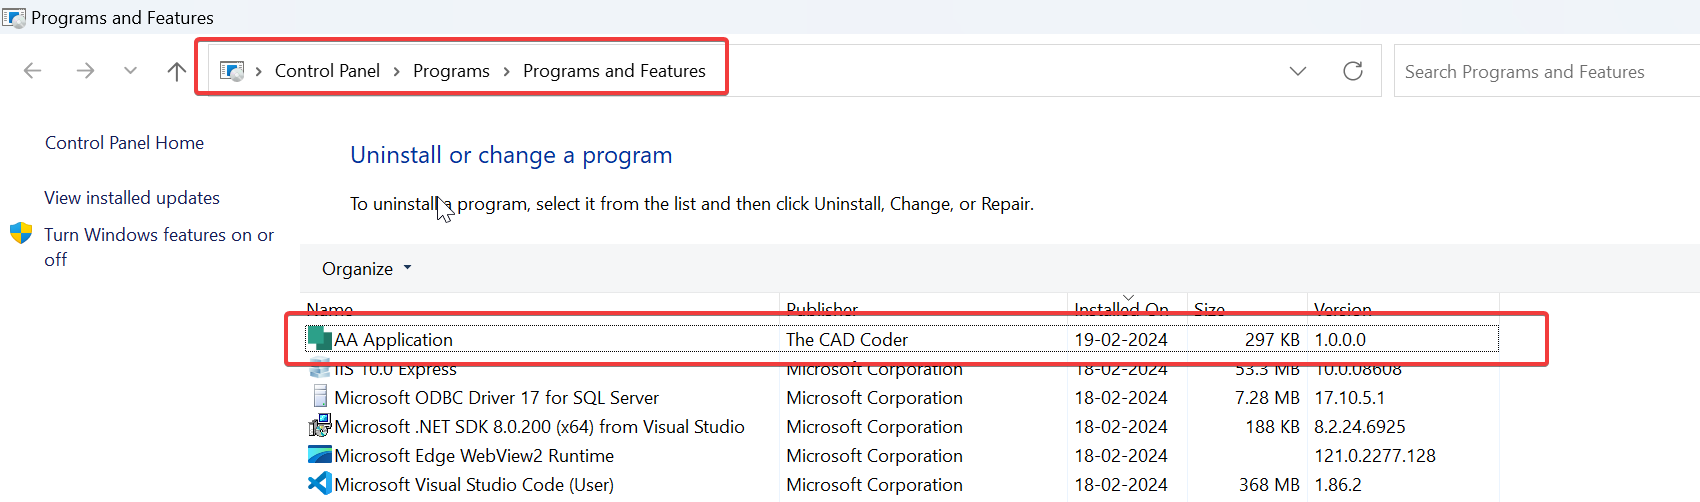
Wix Add Remove Program Details
In this article we create MSI Details for Add/Remove Program details.
Please see below 👇🏻 image of Visual Studio for reference.
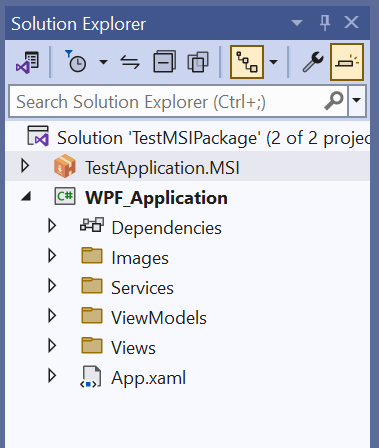
Add [WPF Project]
For this demo, I added a sample WPF Project.
Please see below 👇🏻 image of [sample WPF Project] for reference.
Application Logo
In my sample WPF Project, application logo file is placed at below location.
Logo File Location: [Images/logo.ico]
Please see below 👇🏻 image for reference.
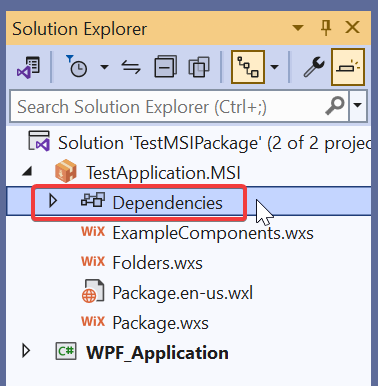
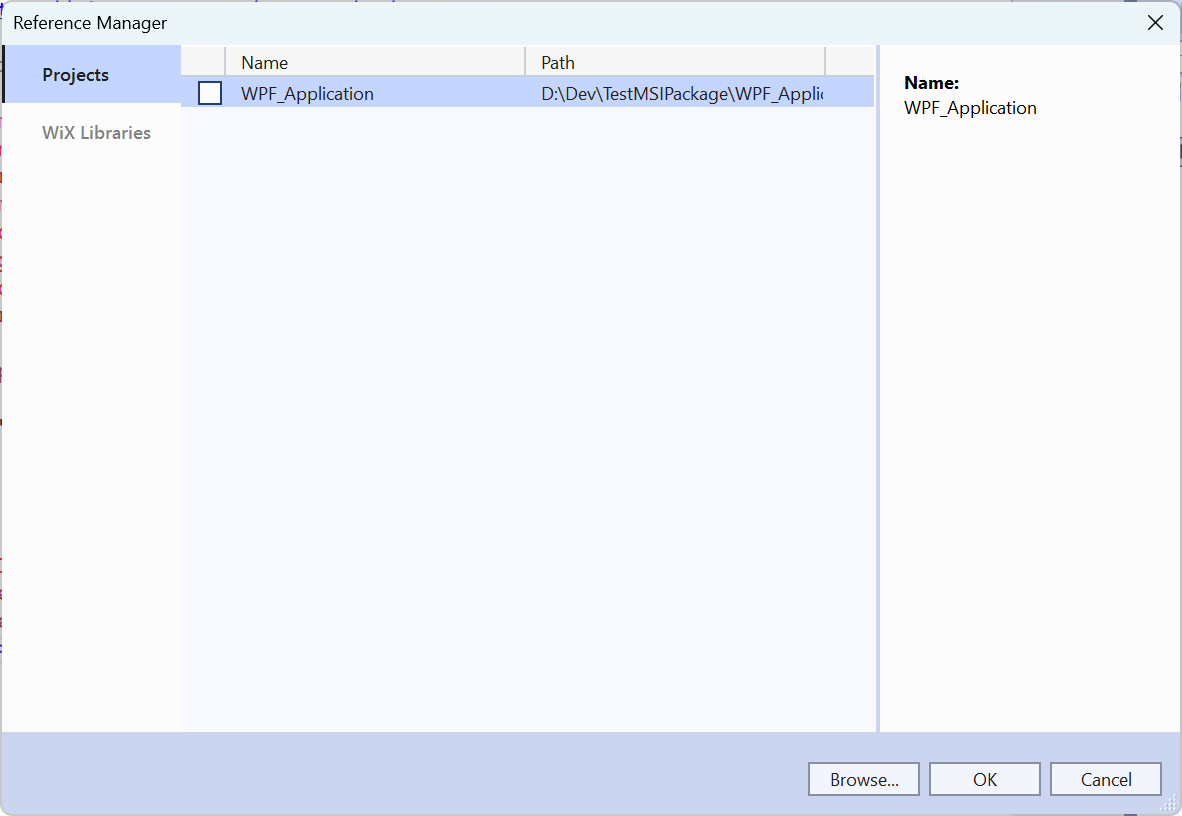
Reference WPF Project
In our [TestApplication.MSI] project, we need to reference our WPF Application.
For this select [Dependencies] node as shown in below 👇🏻 image.
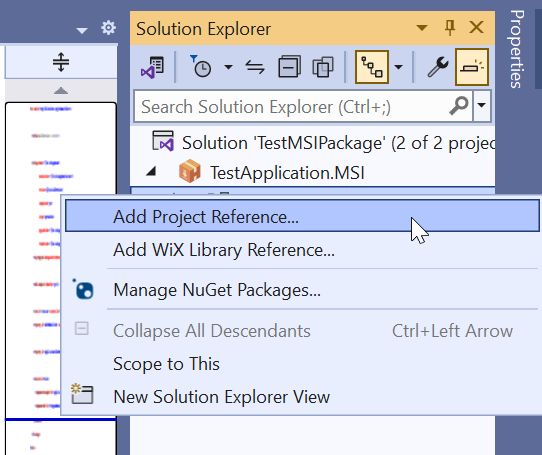
Right Click on [Dependencies] node and select [Add Project Reference] as shown in below 👇🏻 image.
This will show [Reference Manager] window as shown in below 👇🏻 image.
Then select [CheckBox] in front of project you want to add as a [Primary Project] as shown in below 👇🏻 image.
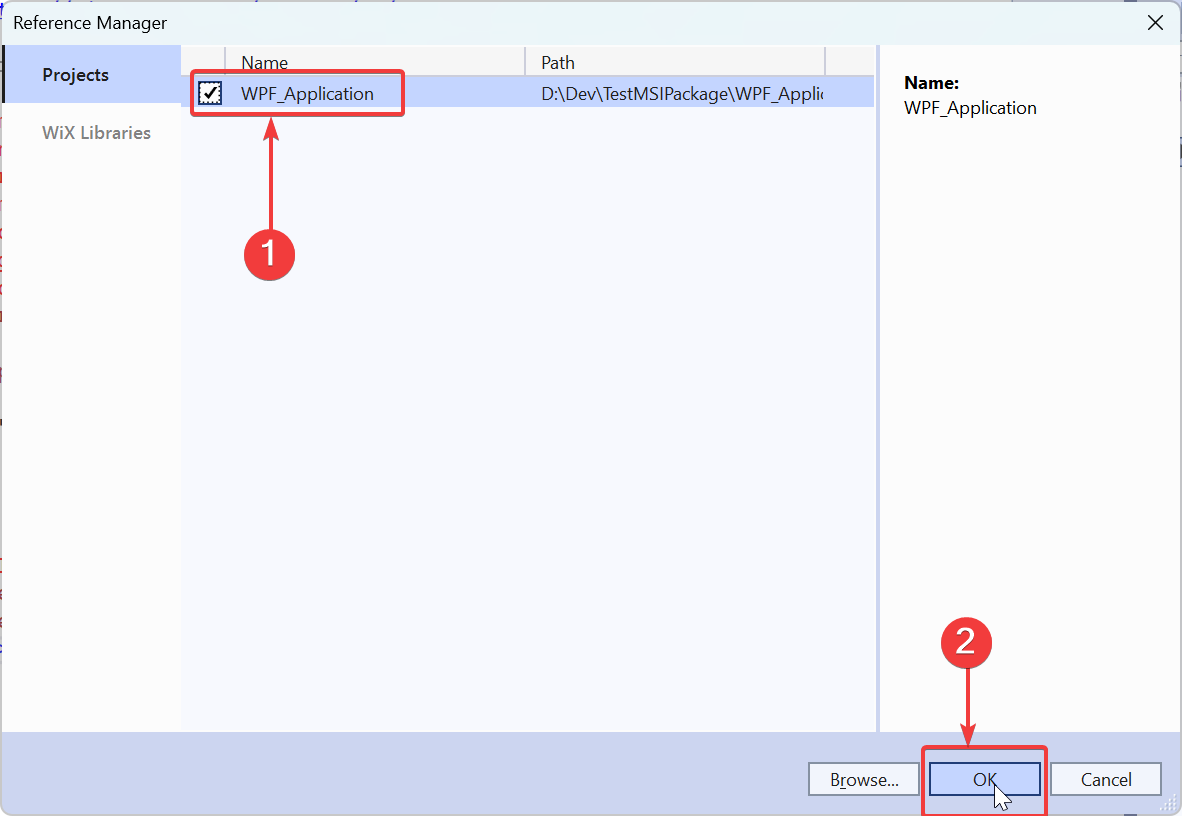
By this we complete the process of referencing WPF Project into our Wix MSI Project for further use.
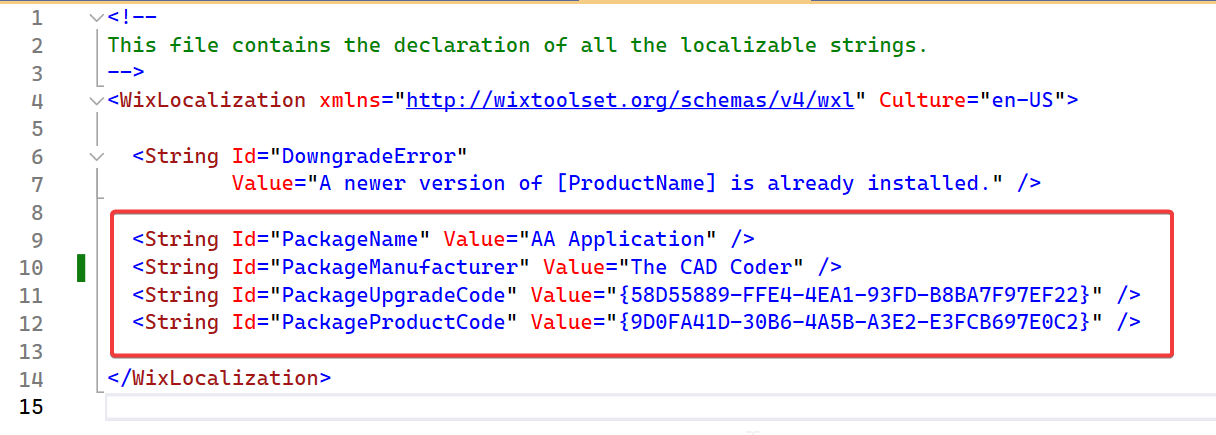
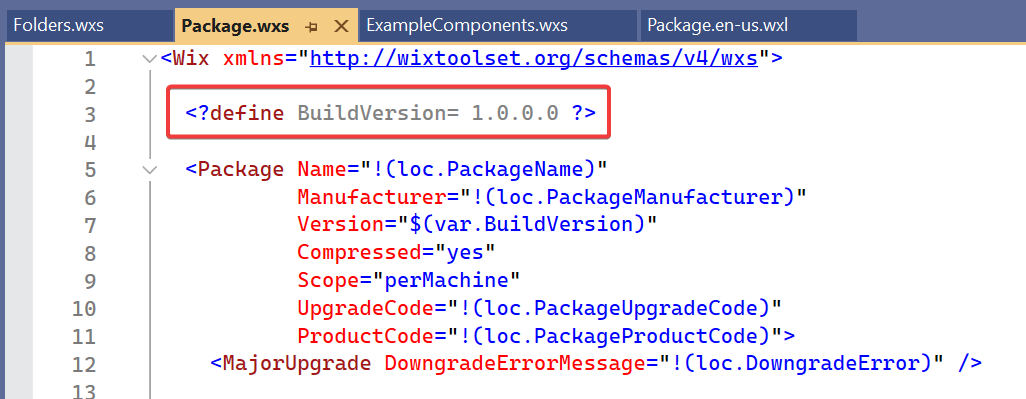
Update [Package.en-us.wxl]
In Wix MSI Project we need to add required variables into [Package.en-us.wxl] file.
First open [Package.en-us.wxl] file then add required variables.
Below variables are required.
PackageNamePackageManufacturerPackageUpgradeCodePackageProductCode
Please see below 👇🏻 image of [Package.en-us.wxl] file for reference.
Please see below code sample for example.
<!--
This file contains the declaration of all the localizable strings.
-->
<WixLocalization xmlns="http://wixtoolset.org/schemas/v4/wxl" Culture="en-US">

  <String Id="DowngradeError"
          Value="A newer version of [ProductName] is already installed." />

  <String Id="PackageName" Value="AA Application" />
  <String Id="PackageManufacturer" Value="The CAD Coder" />
  <String Id="PackageUpgradeCode" Value="{58D55889-FFE4-4EA1-93FD-B8BA7F97EF22}" />
  <String Id="PackageProductCode" Value="{9D0FA41D-30B6-4A5B-A3E2-E3FCB697E0C2}" />

</WixLocalization>
PackageName: This is Name of MSI Package.PackageManufacturer: This is Name of Package Manufacturer.PackageUpgradeCode: This is Package UpgradeCode. This is very important field. For one MSI package this is always unique and never changes.PackageProductCode: This is Package Product Code. This is also very important. For each MSI Version this always change otherwise while installing MSI will give error of same version already installed.
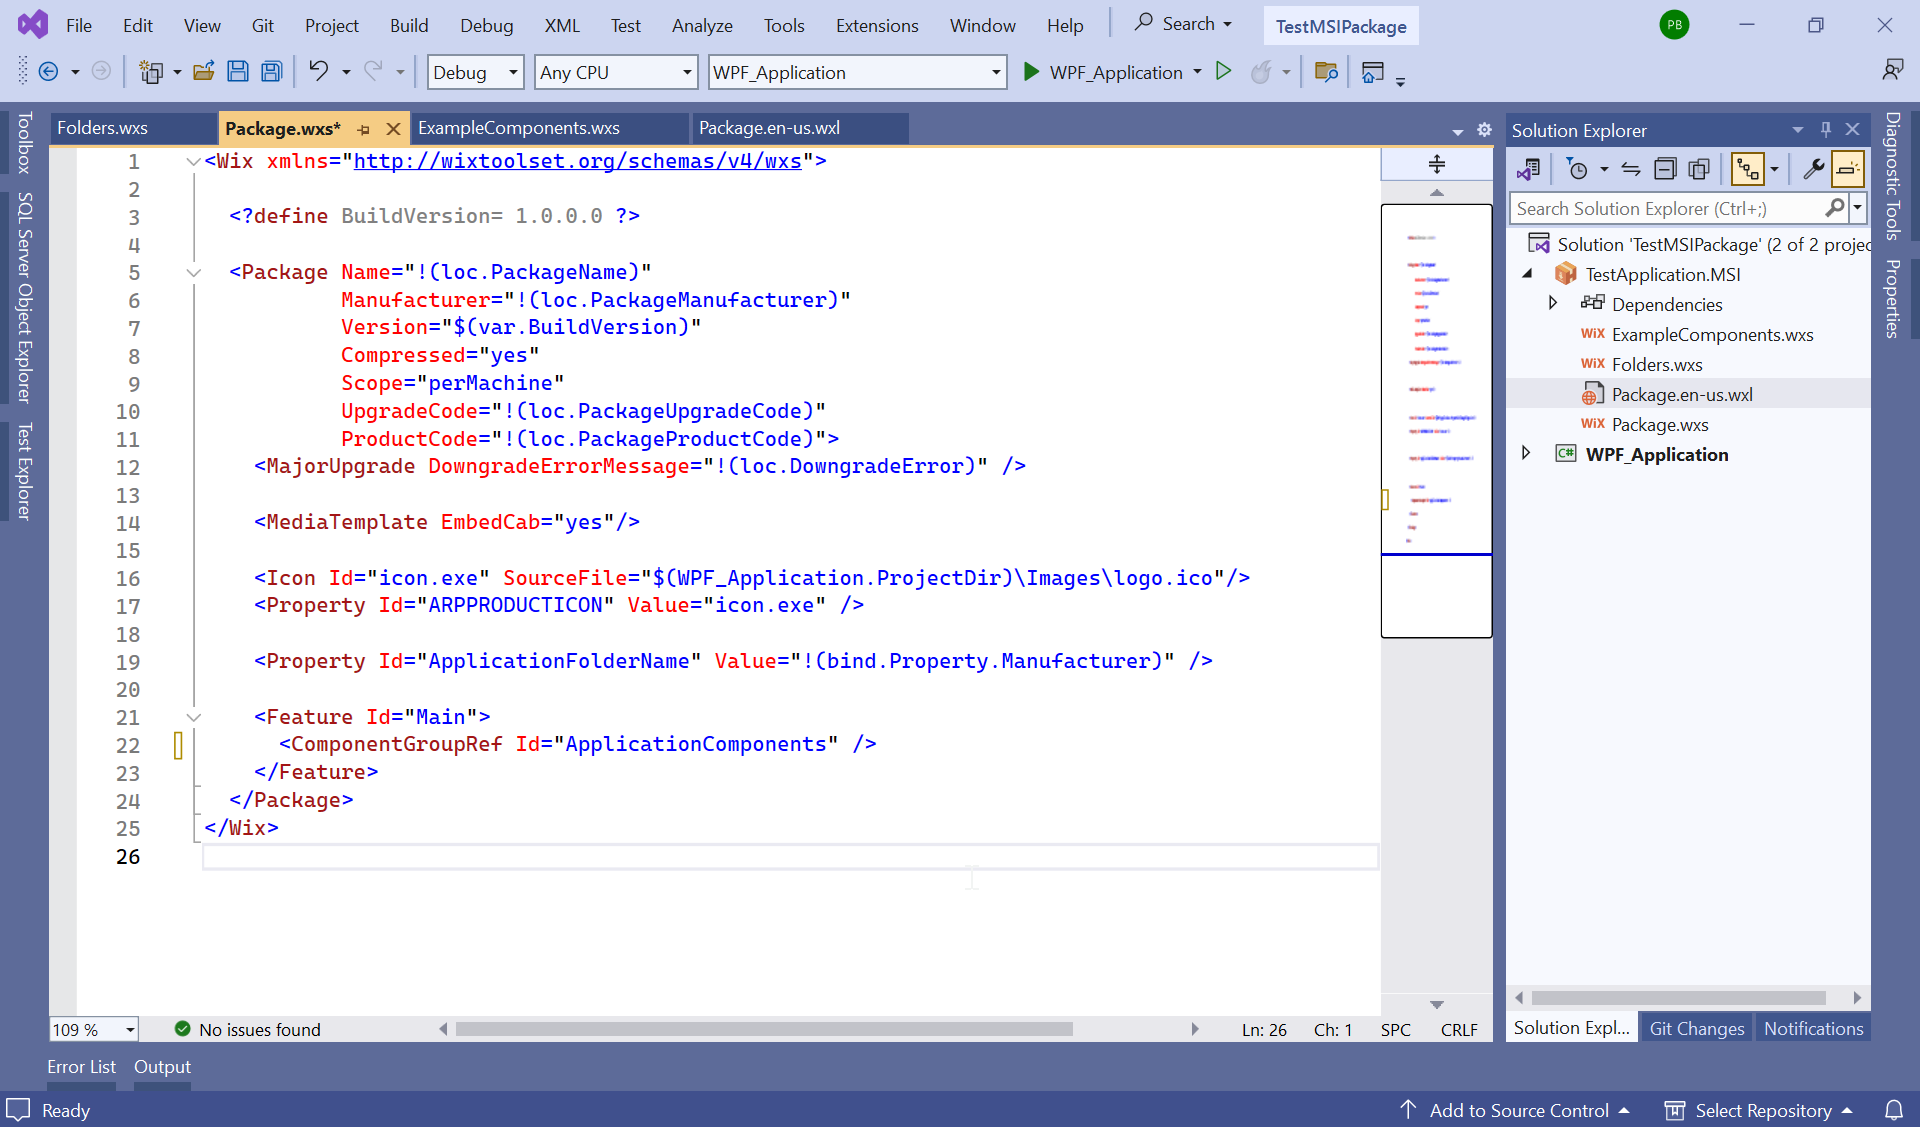
Update [Package.wxs]
Below image show default content of Package.wxs
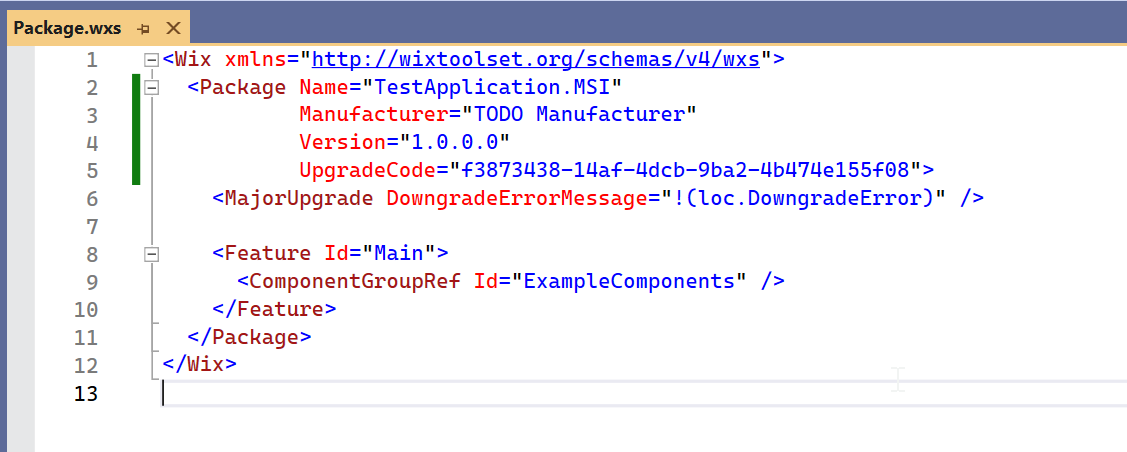
<Wix xmlns="http://wixtoolset.org/schemas/v4/wxs">
  <Package Name="TestApplication.MSI"
           Manufacturer="TODO Manufacturer"
           Version="1.0.0.0"
           UpgradeCode="f3873438-14af-4dcb-9ba2-4b474e155f08">
    <MajorUpgrade DowngradeErrorMessage="!(loc.DowngradeError)" />

    <Feature Id="Main">
      <ComponentGroupRef Id="ExampleComponents" />
    </Feature>
  </Package>
</Wix>
Below image show updated content of Package.wxs
<Wix xmlns="http://wixtoolset.org/schemas/v4/wxs">

  <?define BuildVersion= 1.0.0.0 ?>

  <Package Name="!(loc.PackageName)"
           Manufacturer="!(loc.PackageManufacturer)"
           Version="$(var.BuildVersion)"
           Compressed="yes"
           Scope="perMachine"
           UpgradeCode="!(loc.PackageUpgradeCode)"
           ProductCode="!(loc.PackageProductCode)">

    <MajorUpgrade DowngradeErrorMessage="!(loc.DowngradeError)" />

    <MediaTemplate EmbedCab="yes"/>

    <Icon Id="icon.exe" SourceFile="$(WPF_Application.ProjectDir)\Images\logo.ico"/>
    <Property Id="ARPPRODUCTICON" Value="icon.exe" />

    <Feature Id="Main">
      <ComponentGroupRef Id="ApplicationComponents" />
    </Feature>
  </Package>
</Wix>
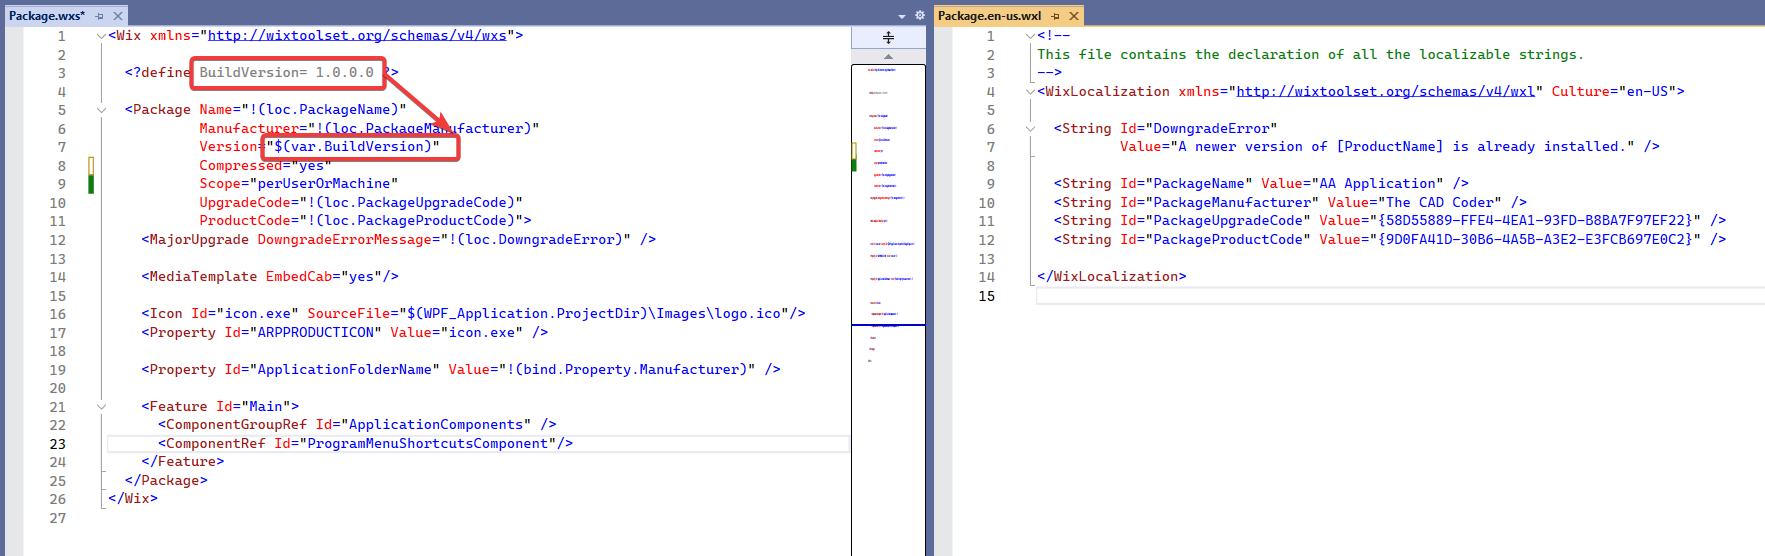
Local Variable
Below line represent a variable in Wix.
<?define BuildVersion= 1.0.0.0 ?>
We create variable by <?define ?> tag.
Above we created a variable with:
- Name:
BuildVersion - Value of Variable:
1.0.0.0
For accessing value of variable BuildVersion we use $(var.BuildVersion).
Please see below 👇🏻 image of for reference.
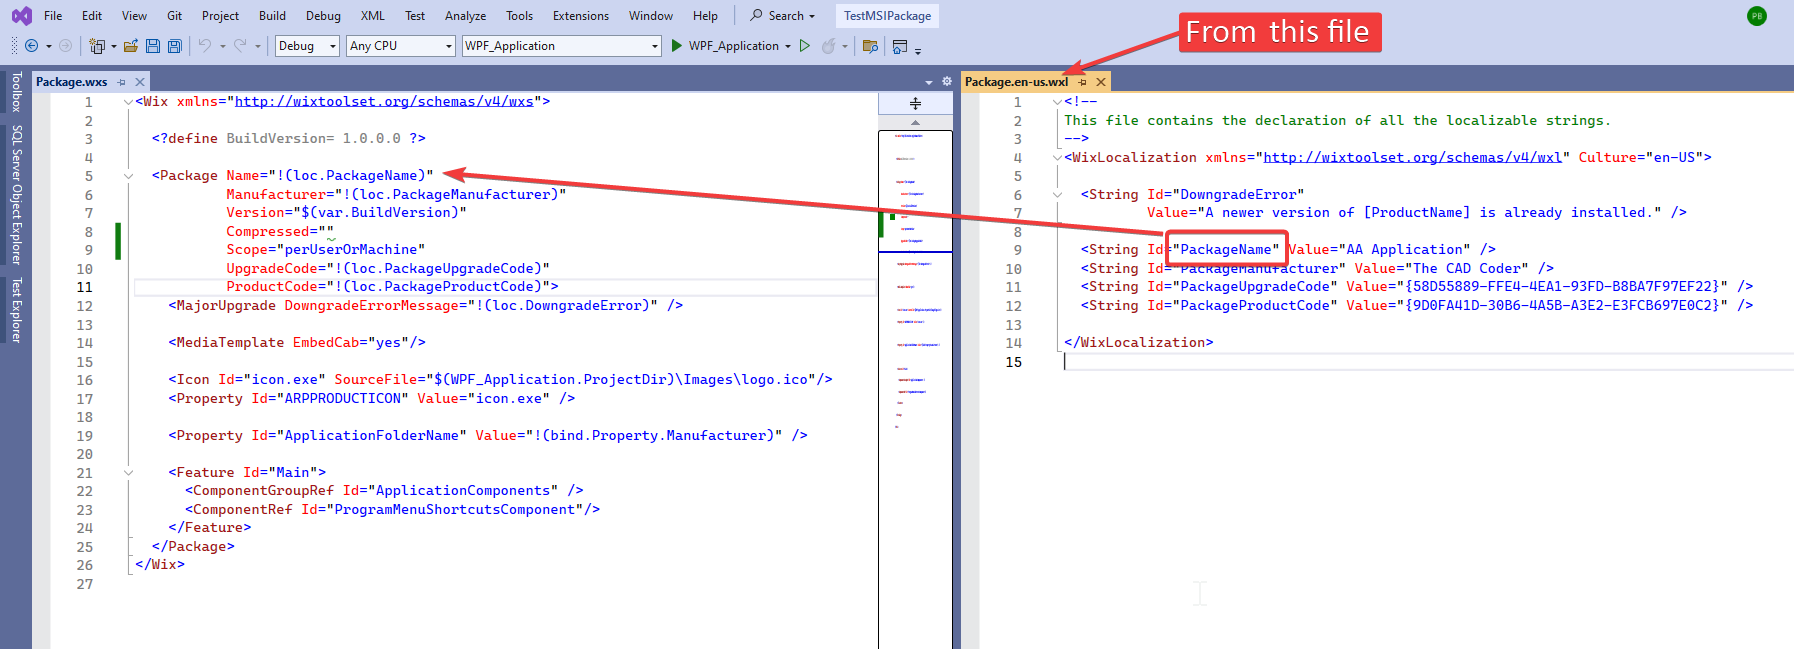
[Package] Element
In this section, we understand updated [Package] element.
<Package Name="!(loc.PackageName)"
         Manufacturer="!(loc.PackageManufacturer)"
         Version="$(var.BuildVersion)"
         Compressed="yes"
         Scope="perMachine"
         UpgradeCode="!(loc.PackageUpgradeCode)"
         ProductCode="!(loc.PackageProductCode)">

</Package>
Name:
- Sets the name of the package.
- Value:
!(loc.PackageName) !(loc.PackageName)means, search for variable in Wix Localization file (in our case [Package.en-us.wxl] file), whose name isPackageName, and set its value here.
[!(loc.VariableName)] is how you call the value of a variable defined in a WiX Localization (.wxl) file.
Please see below 👇🏻 image of for reference.
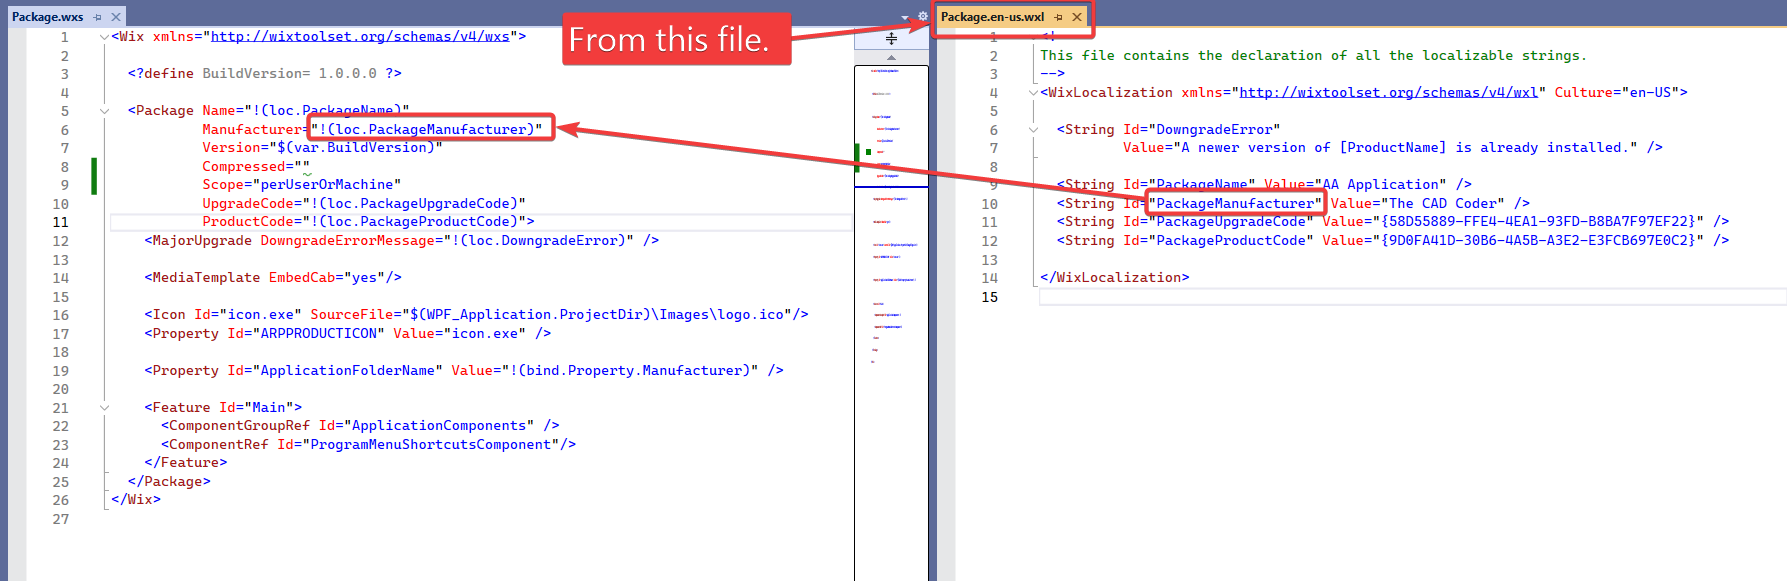
Manufacturer:
- Sets the name of the company that created the software included in the installer.
- Value:
!(loc.PackageManufacturer) !(loc.PackageManufacturer)means, search for variable in Wix Localization file (in our case [Package.en-us.wxl] file), whose name isPackageManufacturer, and set its value here.
Please see below 👇🏻 image of for reference.
Version
- Sets the version of the package.
- Value:
$(var.BuildVersion) $(var.BuildVersion)means, search for variable in Wix Source file (in our case [Package.wxs] file), whose name isBuildVersion, and set its value here.
[$(var.BuildVersion)] is how you call the value of a variable defined in a WiX source (.wxs) file.
These are also local variables, as defined previously.
Please see below 👇🏻 image of for reference.
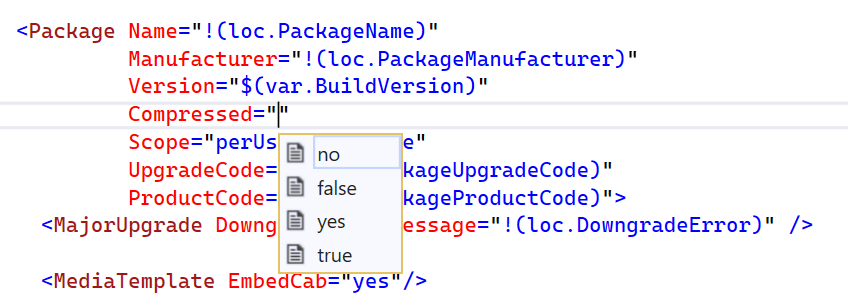
Compressed
- Compressed files.
- Value accepted:
"Yes/true"OR"No/false" - Current Value:
Yes
Please see below 👇🏻 image of for reference.
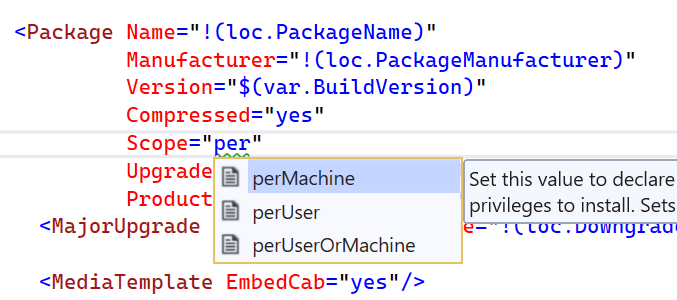
Scope
- To define the installation scope of package:
- Per-machine
- Per-user
- Value accepted:
"perMachine"OR"perUser"ORperUserOrMachine - Current Value:
perMachine
Please see below 👇🏻 image of for reference.
UpgradeCode
- The UpgradeCode attribute is important to recognize a package.
- This property will is fix for every package.
- This means once you define, we don’t need to change it when we release a new version of this package.
- Value:
!(loc.PackageUpgradeCode) !(loc.PackageUpgradeCode)means, search for variable in Wix Localization file (in our case [Package.en-us.wxl] file), whose name isPackageUpgradeCode, and set its value here.
Please see below 👇🏻 image of for reference.

ProductCode
- The ProductCode attribute is important to recognize a package.
- This property will is always change for every package.
- This means we need to change it when we release a new version of this package.
- Value:
!(loc.PackageProductCode) !(loc.PackageProductCode)means, search for variable in Wix Localization file (in our case [Package.en-us.wxl] file), whose name isPackageProductCode, and set its value here.
Please see below 👇🏻 image of for reference.

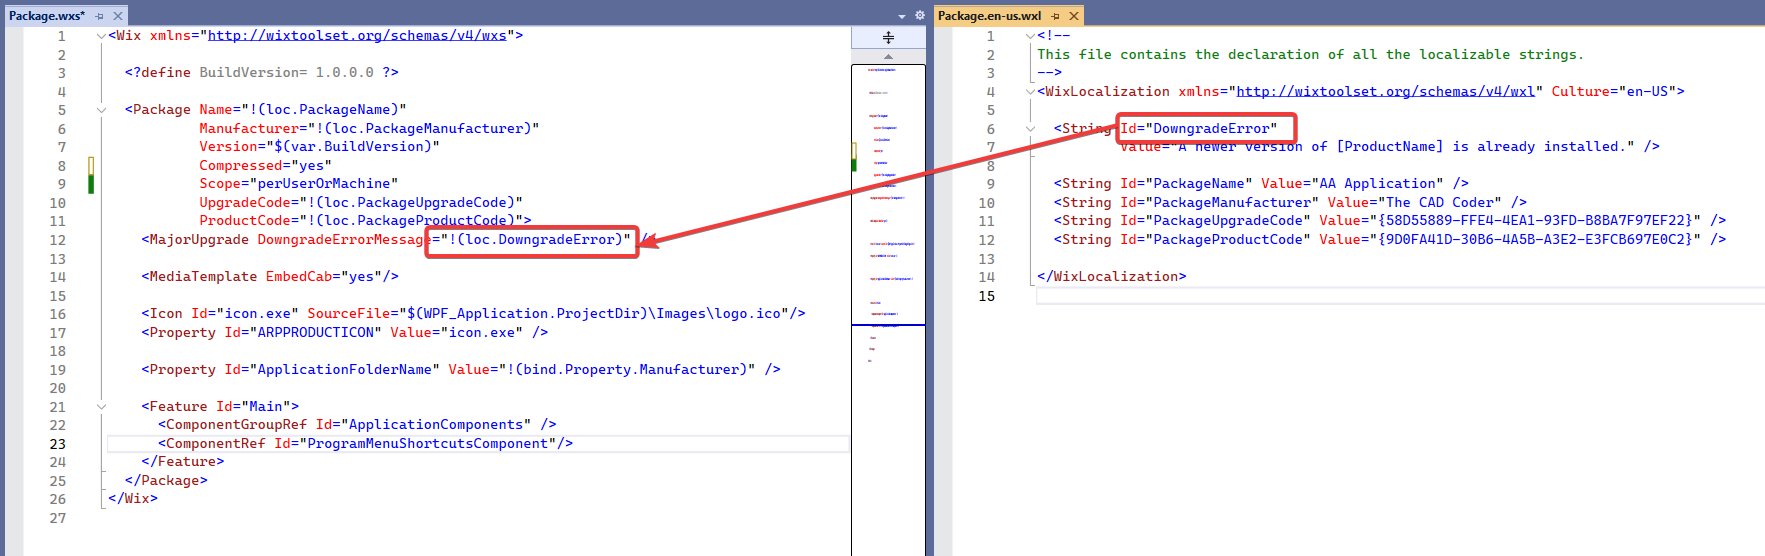
[MajorUpgrade] Element
In this section, we understand [MajorUpgrade] element.
<MajorUpgrade DowngradeErrorMessage="!(loc.DowngradeError)" />
MajorUpgrade
- The
MajorUpgradeElement is important to recognize a package. - It link with
UpgradeCodecode we discuss previously. - When we try to install a lower version than the version that’s already installed.
- The
DowngradeErrorMessageattribute let us specify a message to be shown. - The
!(loc.DowngradeError)syntax is a reference to a localization string i.e. string message to shown.
Please see below 👇🏻 image of for reference.
[MediaTemplate] Element
<MediaTemplate EmbedCab="yes"/>
- [MediaTemplate] describe information to automatically assign files to cabinets.
- Maximum numbers of Cabinet files = 999
[Cabinet] Files
- They are files created with MSI.
- We need to ship them with MSI for deployment.
Please see below 👇🏻 image of for reference.
- Personally I don’t like to ship extra files for deployment.
- For this we embed cabinet files into MSI.
- We do this by specifying “[
EmbedCab]” property. - Set its value to “[
yes]”.
[Icon] Element
Now we define [Icon] for MSI in Add Remove Program.
Please see below 👇🏻 code for reference.
<Icon Id="icon.exe" SourceFile="$(WPF_Application.ProjectDir)\Images\logo.ico"/>
Please see below 👇🏻 image of for reference.
We define 2 properties for [Icon] element.
IdSourceFile
[Id] : Id of Icon file.
[SourceFile] : Path to Icon file.
Values we used.
[Id] : icon.exe
- It is important to write extension of file, on which we want to show icon.
- Not the file which we are referencing.
- In our case, we want to show icon for exe file.
[SourceFile] : $(WPF_Application.ProjectDir)\Images\logo.ico
- In above line, we are giving path to our icon file.
- Icon file is present inside “Images” folder of our Application project.
- To access reference project we use [
$(WPF_Application.ProjectDir)]
[Property] Element
Now we define [Property] for application icon of MSI in Add Remove Program.
Please see below 👇🏻 image for reference.
For this we need to use [Property] element and define its special ID and assign value of that special ID.
Please see below 👇🏻 code for reference.
<Property Id="ARPPRODUCTICON" Value="icon.exe" />
As shown in above code sample:
- Tag =
Property - Id = “
ARPPRODUCTICON” - Value = “
icon.exe”
[Feature] Element
Already explained in previous 🚀 Understand Wix V4 Project
[ComponentGroupRef] Element
Already explained in previous 🚀 Understand Wix V4 Project
<ComponentGroupRef Id="ApplicationComponents" />
I have renamed the Id from ExampleComponents to ApplicationComponents to match the updated component group used in this project.
[Build] Solution
Now we need to build the solution as shown below.
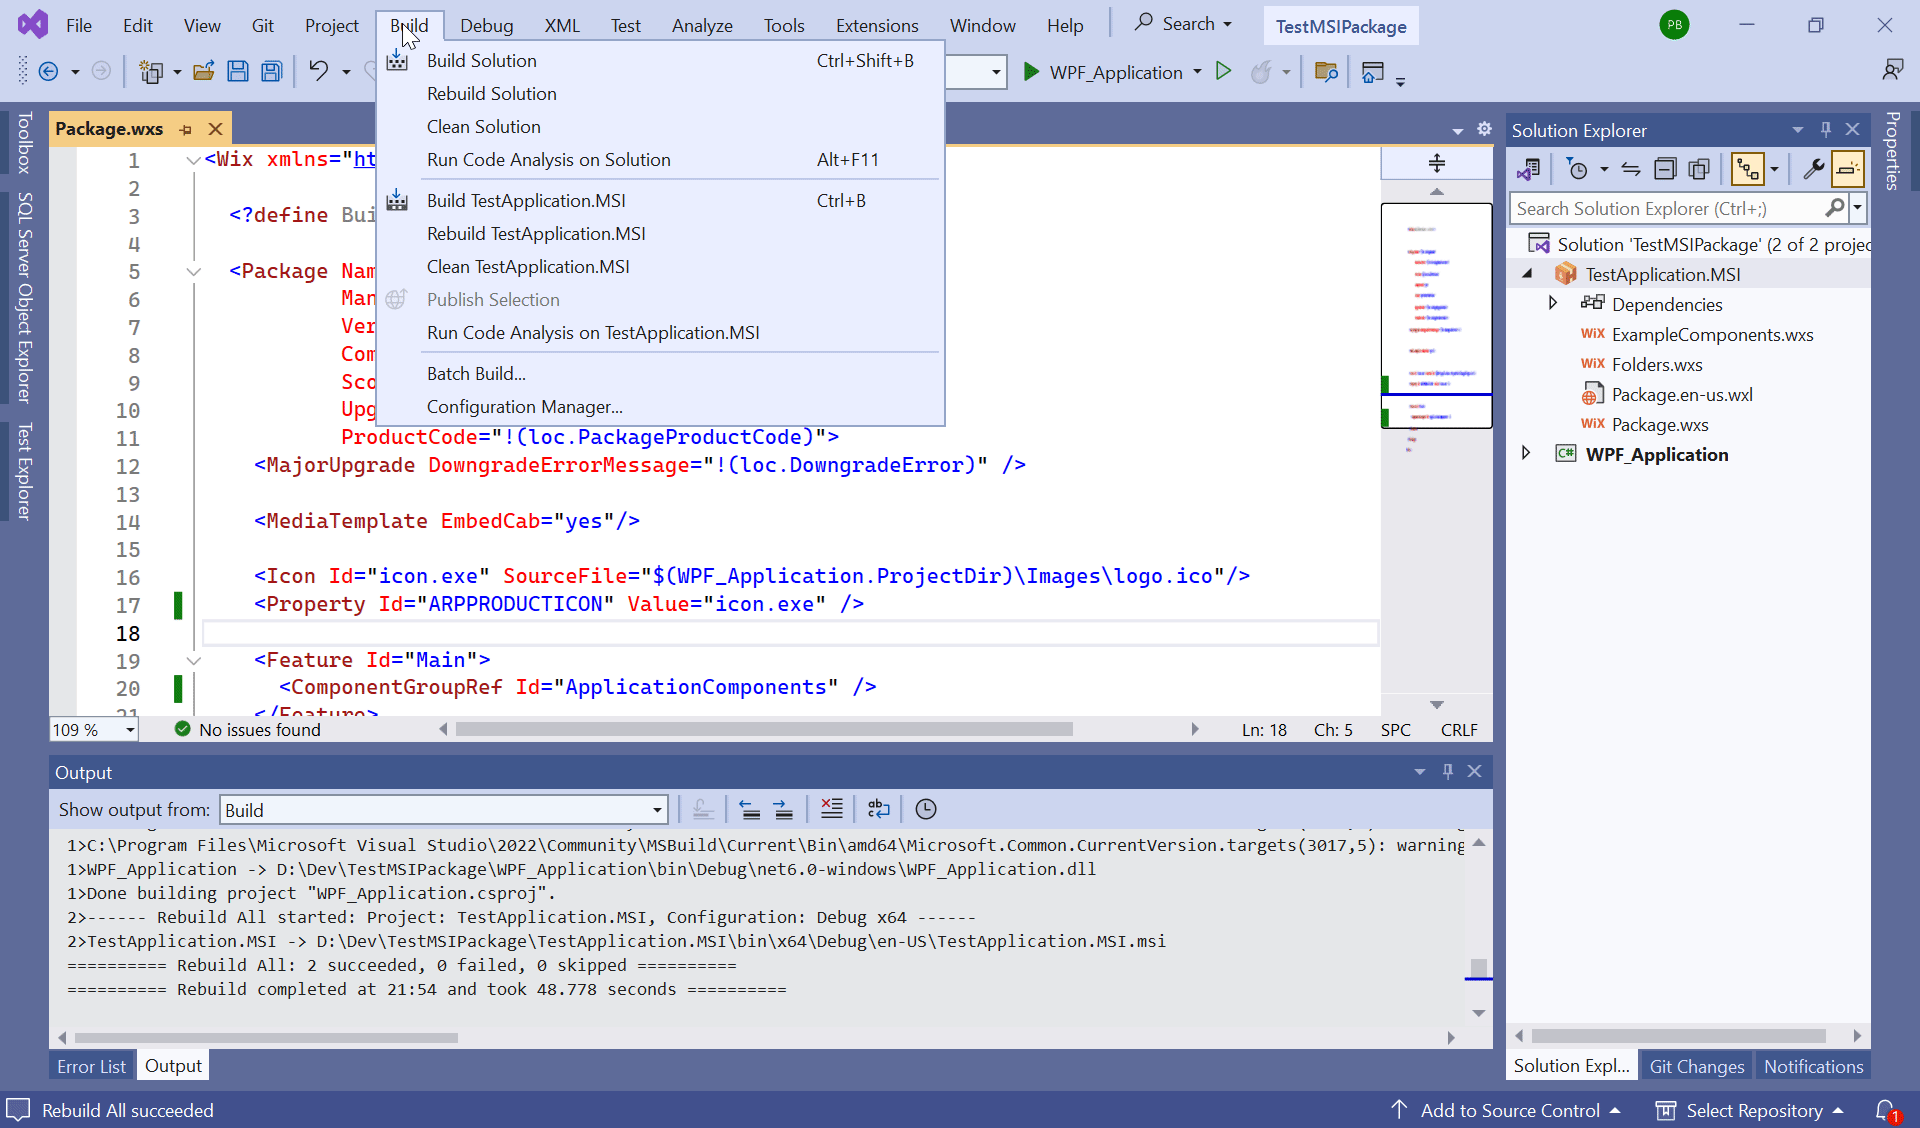
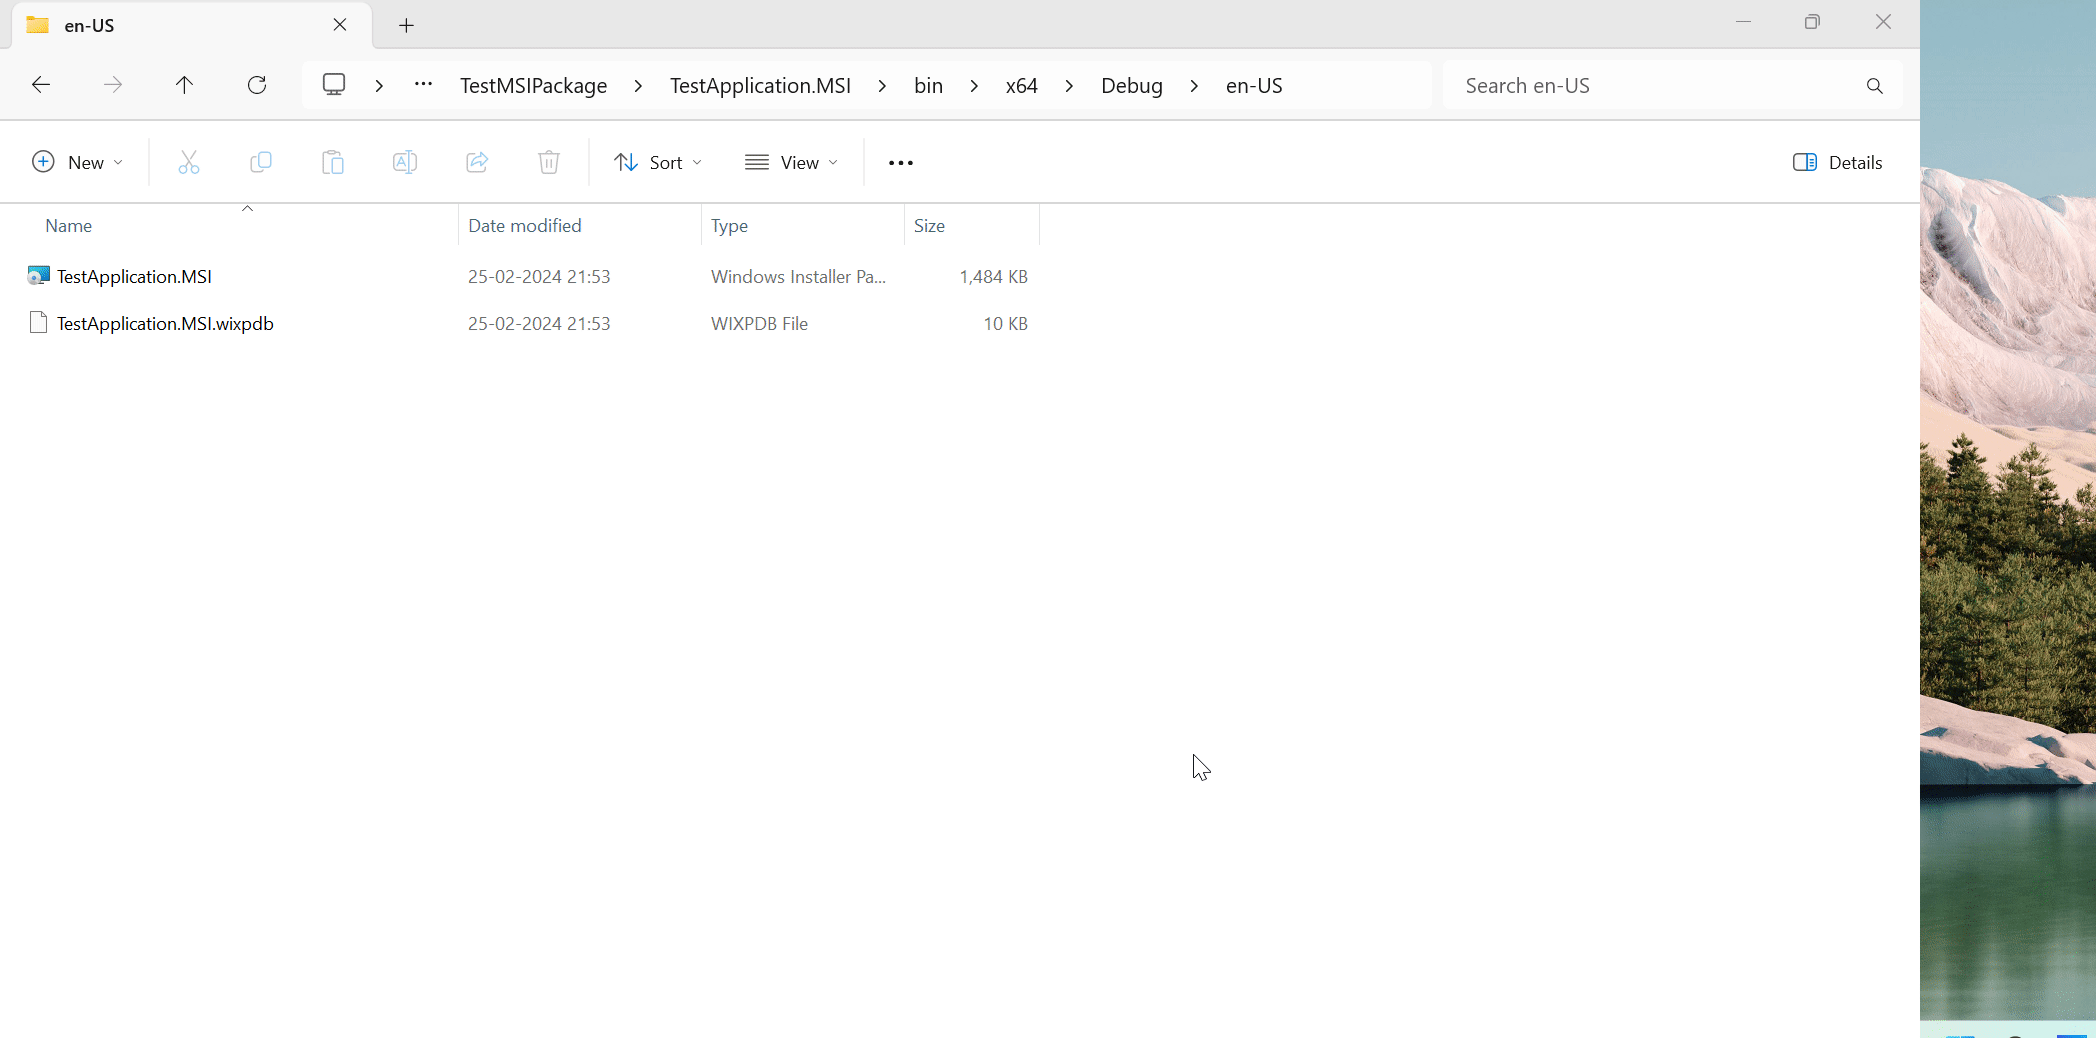
After building the solution, navigate to the folder where the MSI is created.
Please see the image below 👇🏻 for reference.
Final Result
Run the MSI to install the application.
The image below shows the final result after running the installation.
That’s it!!! 🎉
Hope this post helps you.
If you like the post, please share it with your friends.
Do let me know whether you liked this post or not!
Till then, happy learning!!! 🚀