
Open Solidworks & Hello World
In this post, I tell you about how to Open Solidworks using Solidworks C++ API from Visual Studio.
I hope you have setup Visual Studio community version.
If not, please go to the Solidworks C++ API – Prerequisite post and watch the suggested videos before proceeding further.
Video of Code on YouTube
Please see below video on how to Open Solidworks using Solidworks C++ API from Visual Studio.
How to Open Solidworks using Solidworks C++ API
Please note that there are no explaination in the video.
Explaination of each line and why we write code this way is given in this post.
Create a New project
Fist, we will create a new project in Visual Studio.
There are 3 different ways for creating a new project.
-
From File -> New -> Project
-
From New Prject icon.
-
Keyboard Short-cut i.e.
Ctrl+Shift+N.
Below image show how to create a New Project from File option:
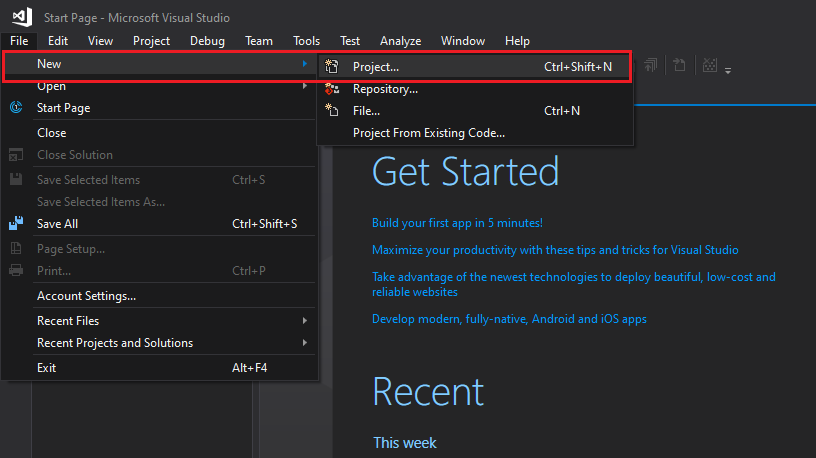
In above image, see Red color box.
Below image show how to create a New Project from New Project Icon option:
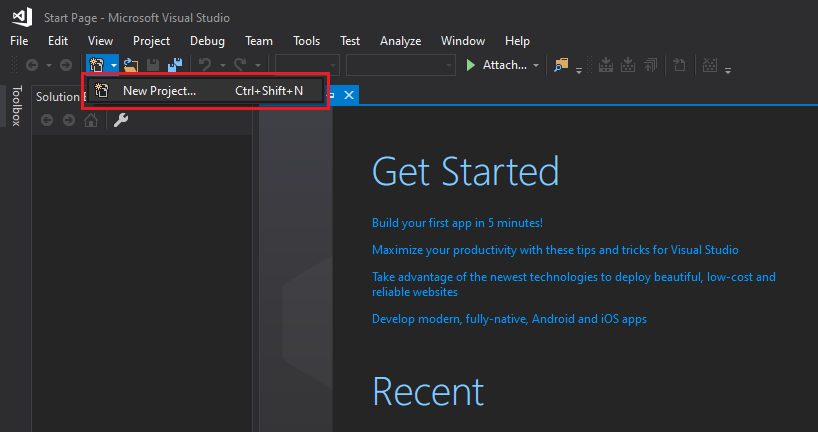
In above image, see Red color box.
When we select one of the above option we get a new window which is shown in below.
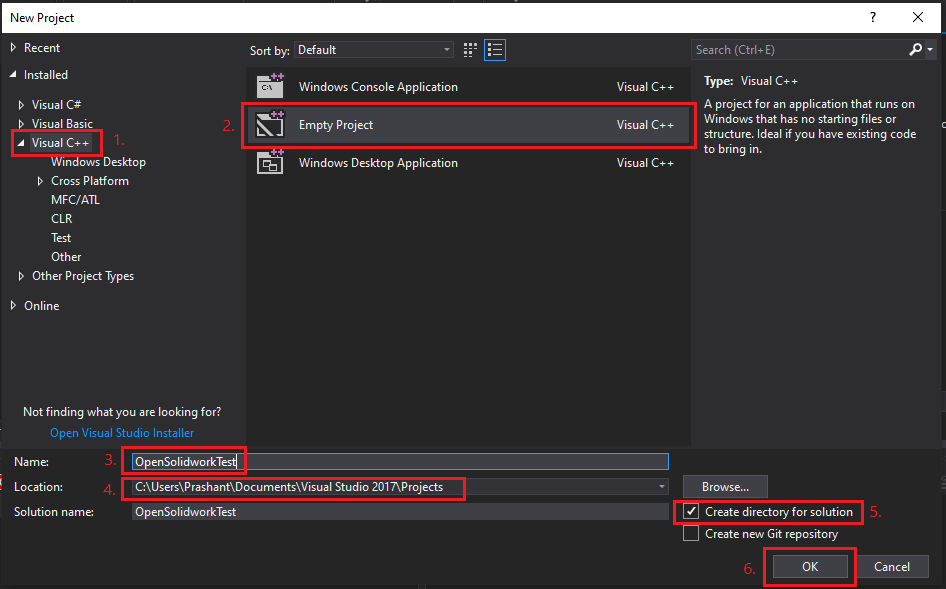
In above image I have numbered the Red colored box.
These numbers are explained below:
-
The programming language you want to use for New Project. For our purpose, we use “Visual C++”.
-
It is, which type of project you want to create. There are 3 different type of projects we can create. In above image, we will create an empty project.
-
It is the name of project we want to create. We named our project as OpenSolidworkTest.
-
The location of project we want. We use default location provided in above image.
-
It is option if we want to create a Solution file for this project or not. In our case, we want to create a Solution file.
-
Hit Ok button after completing all fields.
Add Source file
After creating a new project, we get a screen as shown in below image.
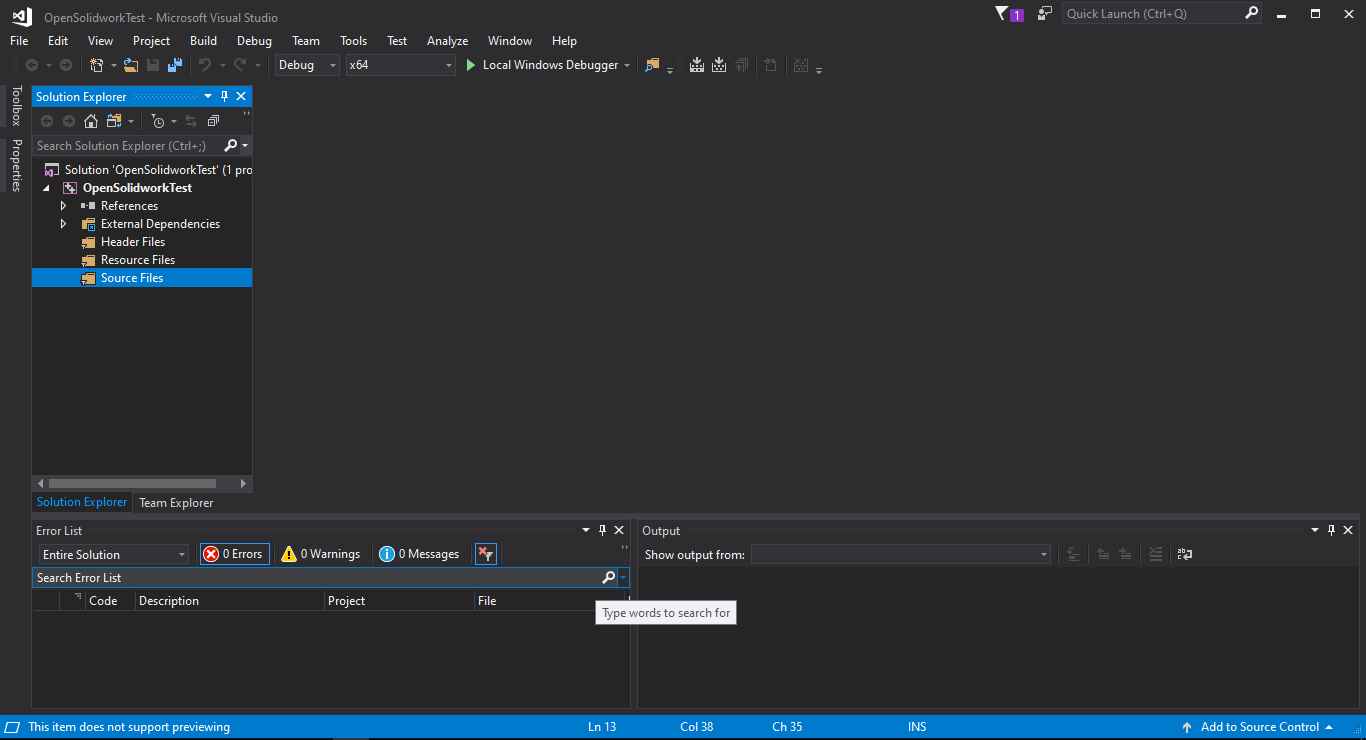
This project has no file to write.
Now we add a cpp file into Source Files filter folder.
For this please follow given steps:
-
For this select Source Files filter folder and Click Right Mouse Button (RMB).
-
By doing this a context menu is appear as shown in below image.
-
From this context menu, select “Add” –> “New Item”, as shown in below image.
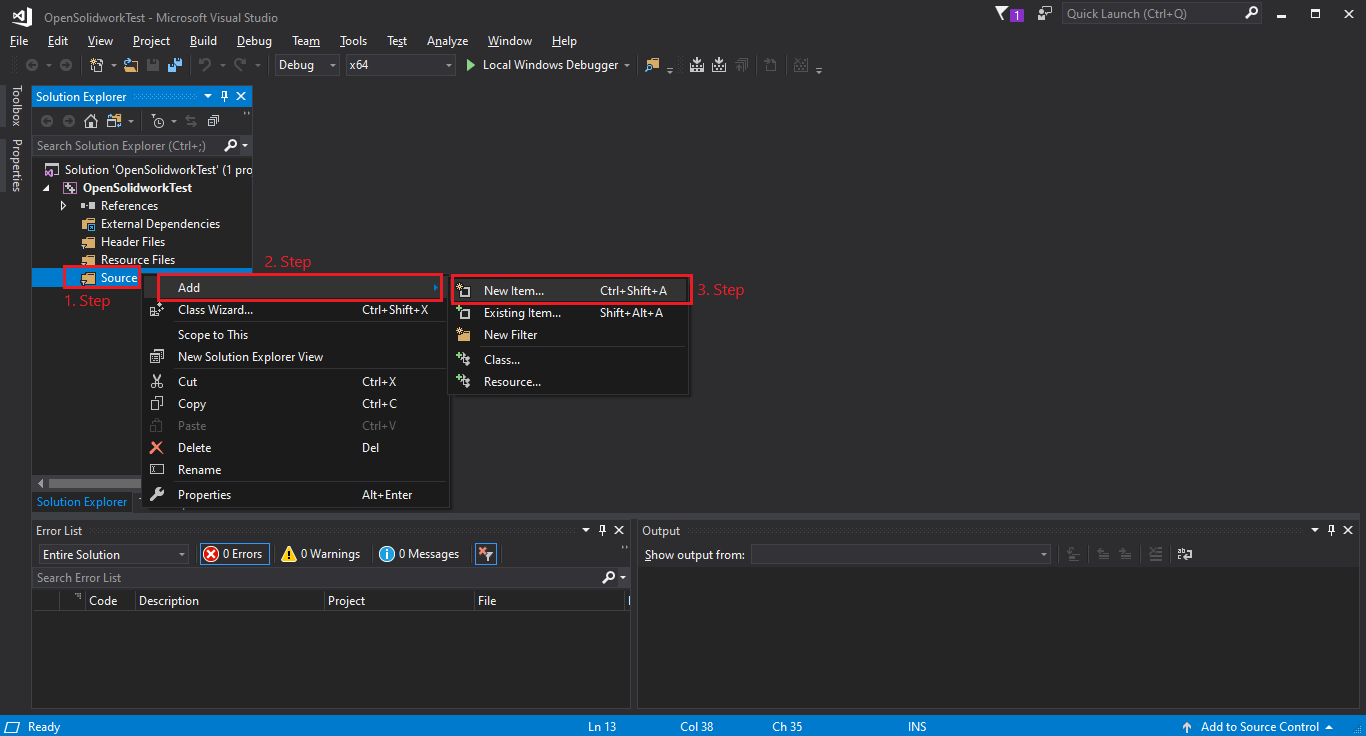
This will open a new window as shown in below image.
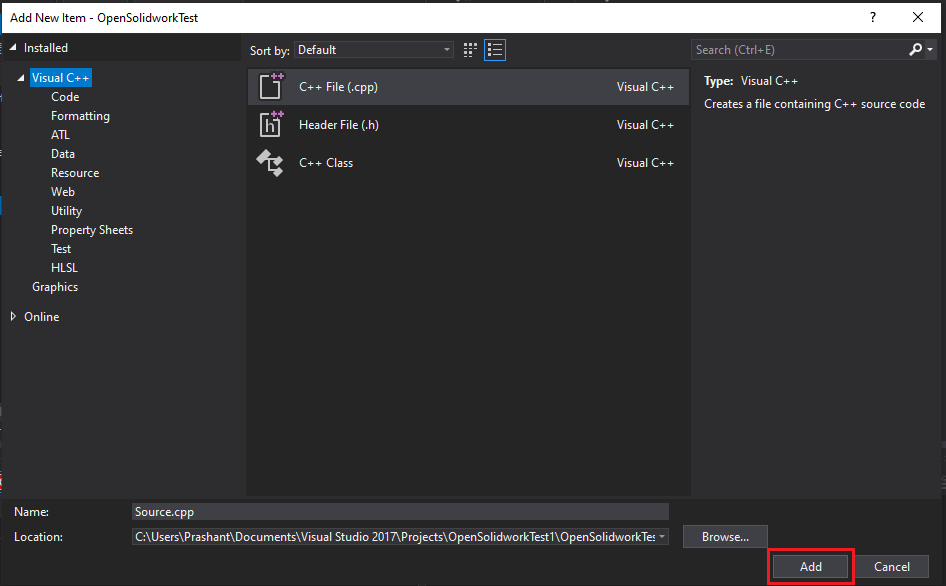
Just select “Add” option as shown in above image.
This will add “Source.cpp” file into our project.
Add References to Solidworks Type Library files
Now we need to add References to Solidworks Type Library files.
For this please follow below steps.
-
Select the OpenSolidworkTest project and and Click Right Mouse Button (RMB).
-
By doing this a context menu is appear as shown in below image.
-
From this context menu, select “Properties” option, which is the last one, as shown in below image.
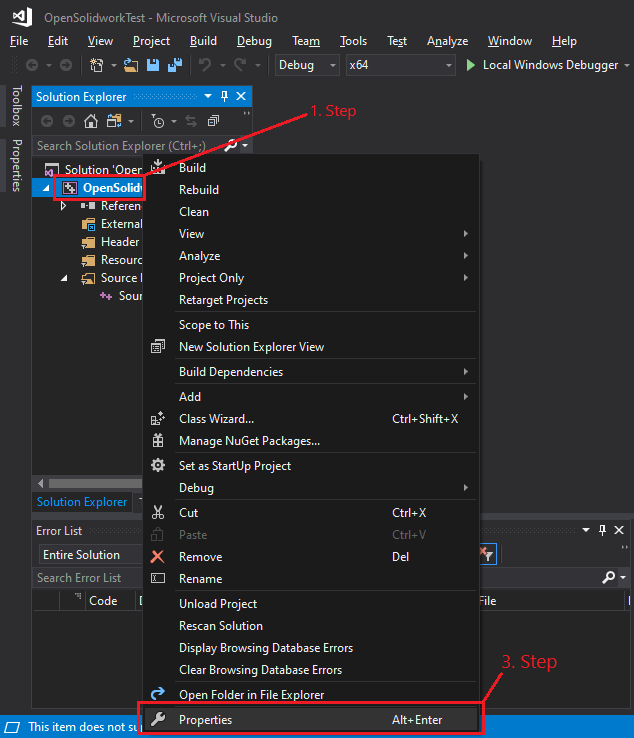
This will open a new window as shown in below image.
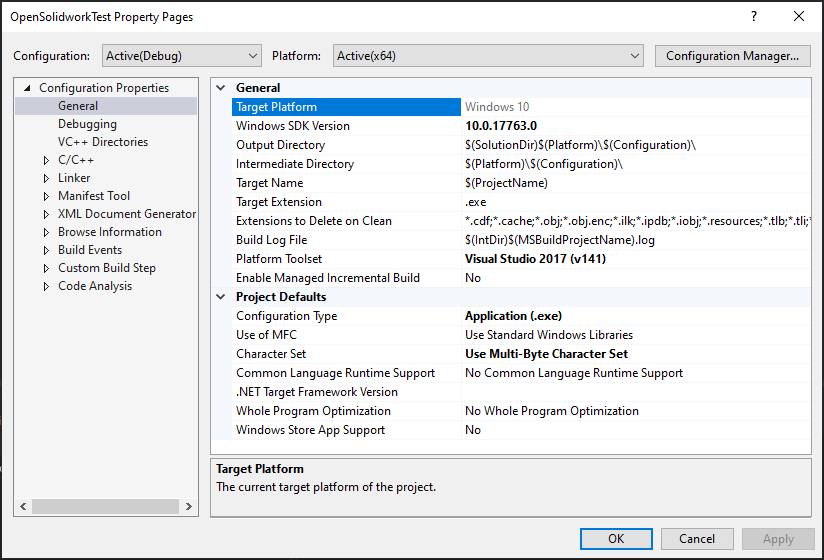
Now following below steps:
-
Select C/C++ option
-
Add SOLIDWORKS folders path to 2nd Red colored box as shown in below image. Usually this path is “
C:\Program Files\ Solidworks Corp\SOLIDWORKS” if installed in default location.
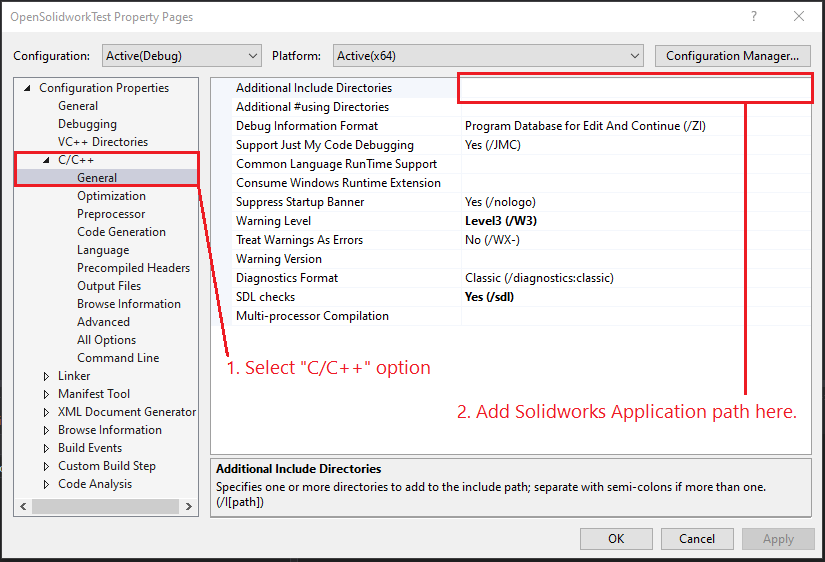
After adding the folder path, select “Apply” button.
This complete the process of adding References to Solidworks Type Library files.
Add Code to Source.cpp file
Now we need to add to Source.cpp file.
Please copy the below code sample to your Source.cpp file.
#include <atlbase.h>

#import "sldworks.tlb" raw_interfaces_only, raw_native_types, no_namespace, named_guids  // SOLIDWORKS type library
#import "swconst.tlb"  raw_interfaces_only, raw_native_types, no_namespace, named_guids  // SOLIDWORKS constants type library

int main()
{
    // Initialize COM
    // Do this before using ATL smart pointers so COM is available.
    CoInitialize(NULL);

    // Use a block, so the smart pointers are destructed when the scope of this block is left
    {
        // COM Pointer of SolidWorks object
        CComPtr<ISldWorks> swApp;

        // Create an instance of SolidWorks application
        // If it fails then return 0 and close program
        if (swApp.CoCreateInstance(__uuidof(SldWorks), NULL, CLSCTX_LOCAL_SERVER) != S_OK)
        {
            // Stop COM
            CoUninitialize();
            return 0;
        }

        // If created successfully, then make SolidWorks visible
        swApp->put_Visible(VARIANT_TRUE);

        // COM-style string for message to user
        CComBSTR messageToUser(L"Hello World!!! I am from SolidWorks C++ API.");

        // long type variable to store the result value by user
        long messageResult;

        // Send a message to user and store the return value
        swApp->SendMsgToUser2(
            messageToUser,
            swMessageBoxIcon_e::swMbInformation,
            swMessageBoxBtn_e::swMbOk,
            &messageResult
        );
    }

    // Stop COM
    CoUninitialize();
}
Now Build the Solution as shown in below image.
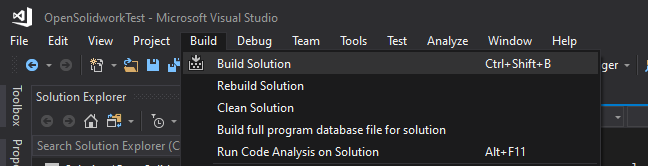
After Building Solution run the program by pressing F5.
Final Result
After running the program wait for few minute.
You will get result as shown in below image!!!
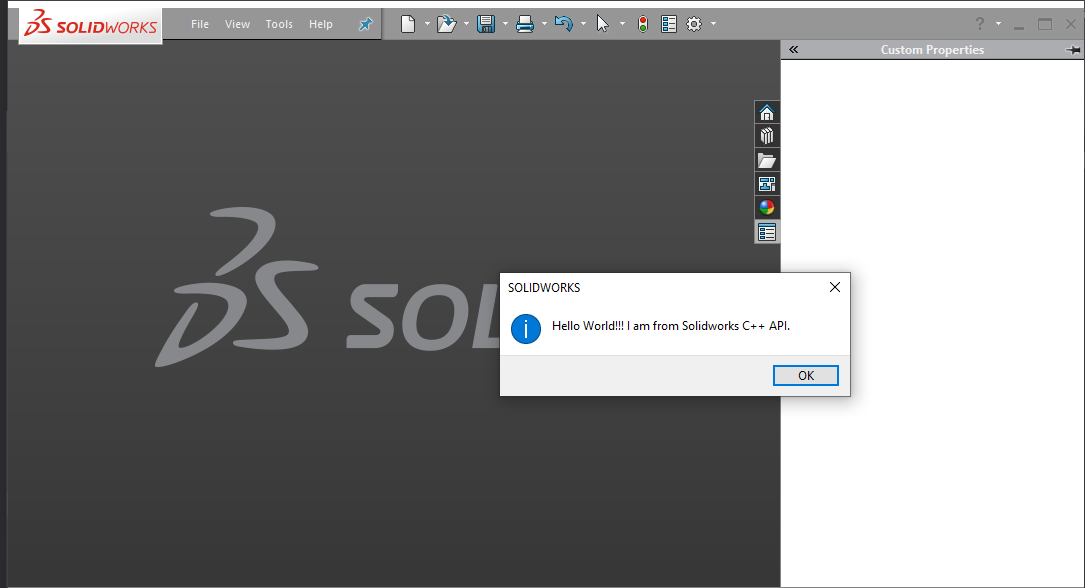
This is it !!!
We have completed our Hello World program in Solidworks using Solidworks C++ APIs.
Hope this post helps you to start with Solidworks C++ API.
If you like the post then please share it with your friends also.
Do let me know by you like this post or not! I will continue creating Solidworks C++ posts.
Till then, Happy learning!!!